Monday, December 15, 2014

A Super Fun Christmas Game

My daughter was looking for ideas for our extended family Christmas get-together and she found THIS GAME.  After reading it, I thought, "I can translate the directions to Spanish and use it with my Spanish classes."

Then I thought, "wouldn't it be fun to ask other MFL teachers if they wanted to complete the activity with 1 (or more) of their classes.  If they tweet or email their best sketch to me, I can create a photo collage of the sketches or post photos of their sketches."

I am going to do this activity with all of my Spanish classes this week.  I'll probably buy a small prize for the sketch with the most points and/or the best sketch for each class to provide extra motivation for them to concentrate while drawing.

Update: Below are links to two google slides presentations to use with your class:
  1. Presentation from 2014 made by Elena Lopez
   2. Presentation from 2015 made by Ashley Soriano


Are you interested in joining in?
If so...
1. Complete this activity this week with 1 (or more) of your language classes in your Target Language. Update: @lopezelena saw the tweets about the activity and then created and shared this Google Presentation of the activity - ready to go for Spanish teachers. Thanks Elena.
2.  TWEET the best sketch(es) with the hashtag #platesketch or email the sketch(es) to me by Friday afternoon, December 19.

I'll make a collage or use another way to share the sketches on my blog and Twitter.

HERE is the link to the document I shared on Twitter. Let the fun begin!
UPDATED version (as seen below) click HERE

After Christmas I discovered that there were many other #platesketch tweets that I had missed, so I uploaded a second book.  Click HERE to view the second book.


Photo Collage from Palmyra High School - Dec. 15, 2014


Wednesday, December 3, 2014

I CAN Statements

One regret of attending ACTFL14 is that I was unable to stay for the Sunday morning sessions.  I had an early Sunday morning direct flight, (at an unbeatable price), which meant I had to miss the last 1/2 day of the conference.

However, there was one Sunday morning session that I was able to hear BEFORE it was presented on Sunday.  It was  "Helping Students Navigage the Can-Do Statements" by co-presenters Michele Whaley and Mira Canion.

On Saturday afternoon, Michele Whaley, Krista Applegate, and I were debating which session to attend.   After several minutes of searching possibilities, we admitted that we were feeling a bit weary from information overload. It was then that Michele asked if we wanted to help her by listening to a practice run through of her Sunday presentation.  Of course I said yes!  We found a quiet area and Michele proceeded to deliver her "practice" presentation on I CAN statements.  Her presentation was informative and helped me to better appreciate the usefulness of I CAN statements.

I returned home from ACTFL pondering how to incorporate I CAN statements in a way that would be beneficial for my students.  In the language department at my school, we don't teach what many refer to as well-defined "units".  It's easy to visualize how I CAN statements fit into traditional units, but not as clear for a curriculum based on high-frequency words and structures. 

It quickly became evident to me that I CAN statements fit hand-in-hand with Backward Planning or Understanding by Design. (Check Carrie Toth's blog "Somewhere to Share", especially this post, for an explanation.)  I looked at what I wanted the students to be able to do and then wrote I CAN statements that matched those goals.  After the statements were written, it was easy to align the class activities and stories to match the statements. (Michele Whaley wrote a blog post this week with an example of how she is implementing the I CAN statements with her students.  Find it HERE!)

On the first day of school after Thanksgiving break, I greeted my students at the door with the above paper of I CAN statements.  Each day I remind them to check the paper and sign any statements they can complete.  Today as I circulated through the class as the students were working in groups, I noticed a student's paper with her signature in several cuffs.  It was evident to me that students are using the statements to monitor their progress. (Note: The I CAN statements pictured above are guiding the students to pull together what we've been working on for the entire semester as they look ahead to the final exam which is less than 20 instructional days away. My future I CAN statements will be more specific to relate to our "units".)
 
This is only the beginning! I have ideas bouncing around my head in other ways to use the I CAN statements, and when I have time...(hopefully soon), I'll write additional statements for our "units".

Monday, November 24, 2014

Storyasking & Nearpod

Lately, I've been having fun exploring the uses of Nearpod to present the target language in context in a way that engages all students.  

What is Nearpod?  It is an ipad slide sharing app that enables the teacher to control which slide the students are viewing on their ipads.  You can create a new presentation or upload a powerpoint presentation you have on file onto the Nearpod site.  The teacher views the presentation from her account on Nearpod as the students view the same presentation on ipads or ipods.  

Nearpod goes beyond being a simple powerpoint presentation.  There are options to embed quizzes, polls, sketches, matching activities, fill in the blanks, add voice, etc.  As the students answer and complete the activities, the teacher can view their answers in real time on her computer screen.  Also, there is the ability for the teacher to share the students' answers anonymously with the class.  By clicking "share", one student's answer will appear on all the ipad screens.

Below is an explanation and example of one of the Nearpod presentations I created and used with my Spanish 2 classes.

My focus structures were: se durmió, se despertó, and estaba cansado.  I wrote a story with a plot that provided opportunities to repeat those structures throughout the story.  You can write text directly on the Nearpod slides, but it was too limiting to me, so I wrote the text on a powerpoint slide and uploaded it as an image. I looked for places in the text where I could check for students' comprehension, and places where I wanted the students to add their ideas to the story. Then I added slides in the Nearpod presentation with comprehension questions, polls, questions that required the students to sketch, and a fill in the blank activity to summarize.with questions and polls. I drew some sketches to accompany the story and added the sketches to several of the activity pages on Nearpod. 

The title of the story is Pedro se durmió. Below is a screenshot of the first part of my presentation as it appears on my Nearpod account. 


To start the presentation, each student had an ipad and I gave them the 5 letter code to enter the Nearpod presentation.  As they entered, my screen showed the names of the students.  It also showed the number of students that entered the presentation in the top right corner.  (If at any time a student leaves the Nearpod presentation to explore the internet, the number changes from green to red to alert the teacher that a student has left the session.  The teacher can then click on the icon and see which student is not on task.)

After the students were in the session, the picture of Pedro and the title appeared on their screen.  Then I moved to the first slide with text and I told  them about Pedro.  I used the circling technique to familiarize the students with Pedro's information, along with personalized questions about the students' ages, if they ever went to San Antonio, etc.  

Then I swiped to the next slide, which moved the presentation to the next slide on each of the students' ipad screens. This slide had 4 short comprehension questions for them to answer.  As they submitted their answers, I quickly saw which students needed more circling and repetitions of the information.  Below is a screenshot of an example of what the teacher sees as the students answer. (I took this screenshot for this post, not during the actual presentation with the students.)


The next slide had additional text, followed by a slide that asked students why Pedro was so tired.  They typed in their answers and I watched the answers appear on my screen.  I told the class about 3 of the options the students had written and I wrote the sentences on the board rather than share the students' screens. (This is a Spanish 2 class and since there were small errors in the answers, I didn't want the students seeing the errors.)  I then wanted the students to choose which option they wanted to be part of the story so on the following slide they could choose a, b, or c.  Their answers appeared on my screen, and the answer with the highest votes became part of our story.

Below is a screenshot of what the teacher sees when the class completes a poll.  (This particular poll below, actually is later in the story.)


I continued the storytelling by reading the text with the students, asking comprehension questions while they had the text on their screens, and asking more personalized questions.

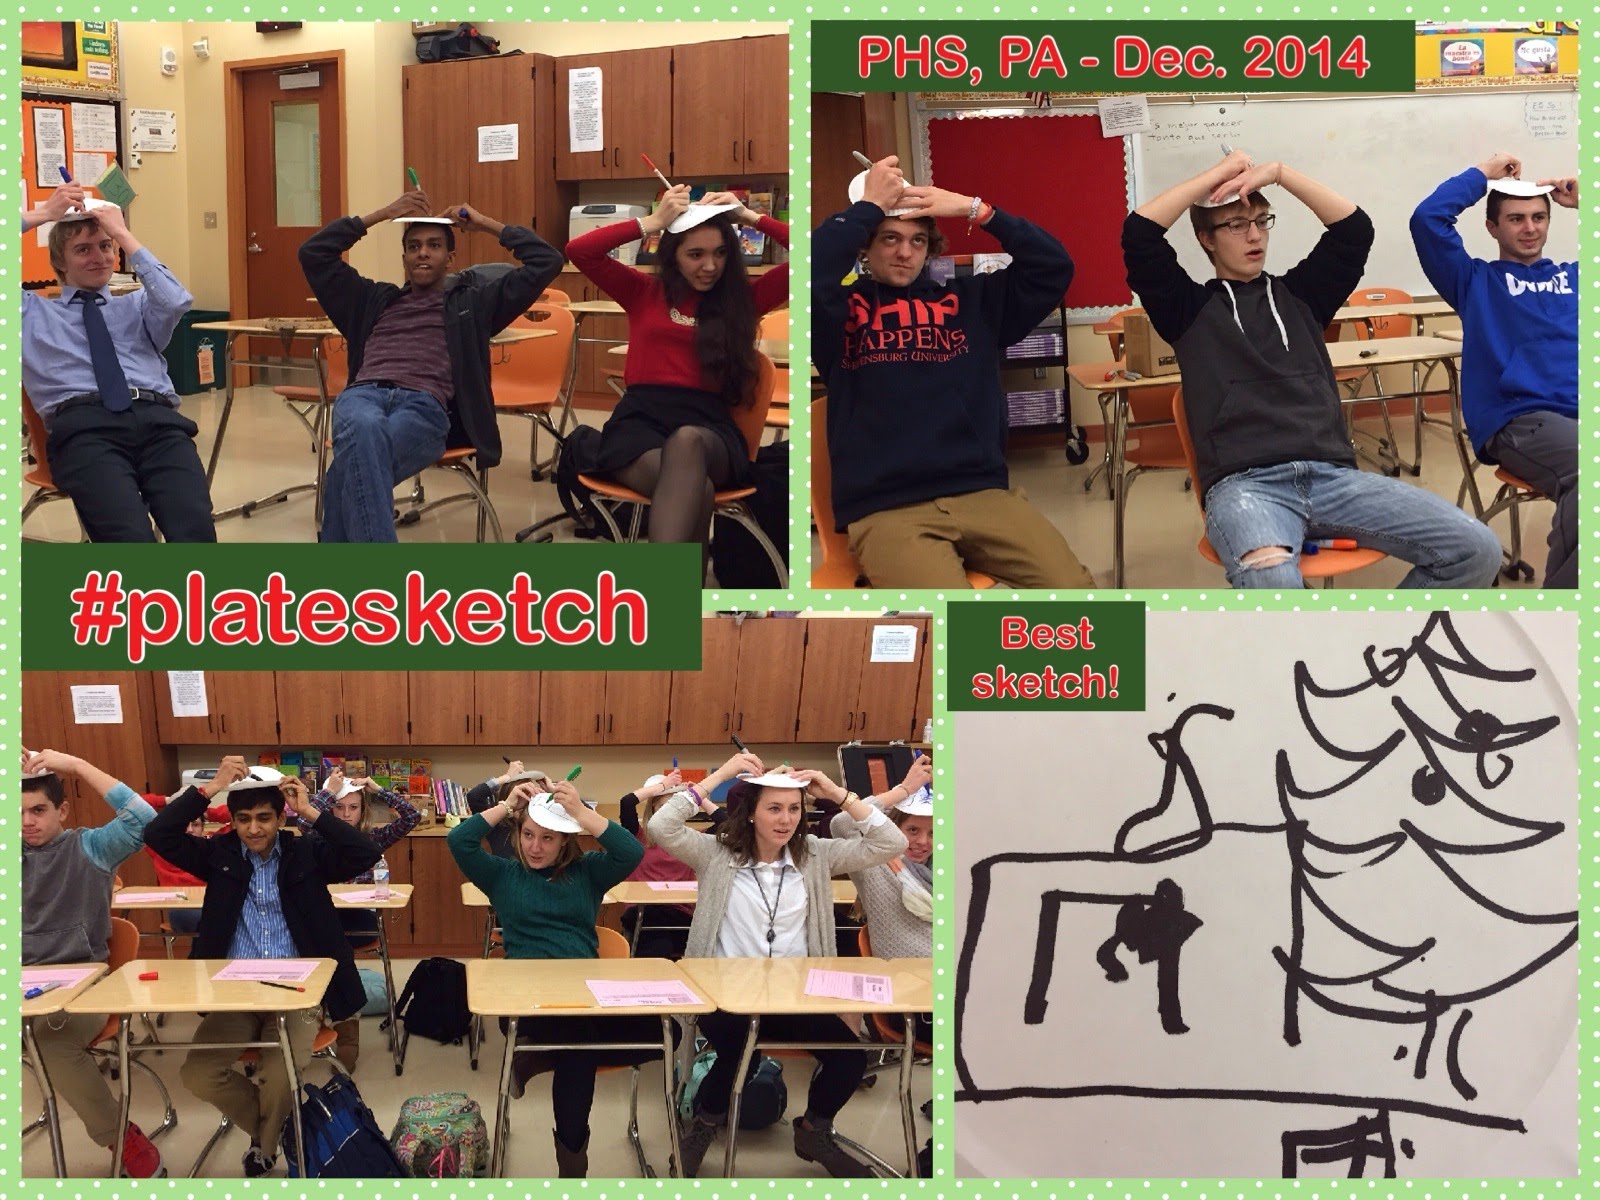
In one part of the story, the students had to sketch what Pedro's two friends did when they saw that he was sleeping. The picture to the right is an example of what a student could draw on their ipad. (I actually drew it to create this blog post).  After the students had submitted their work, I was able to view ALL of their sketches and then anonymously shared the student sketches with the students.   It provided me material for a LOT of repetitions of verbs in the 3rd person plural.

Below is the teacher's screen that shows 3 student sketches.  The teacher can choose all or only a few of the sketches to share with the class to discuss.


On the very last slide, I created a fill in the blank activity.  Since I wanted the students to read, yet one more time, the target structures, I DID NOT choose those words for the students to fill in the blanks.  I chose words close to the target structures so the students had to read the target structures in order to figure out which word in the word bank at the bottom of the page was the best choice.  

The following day in class, we reviewed the story that the class had helped me to create.  Then I distributed a copy of my original story and we read it together. For an additional reading, I had the students form a diagonal line from one corner of the classroom to another. They paired up with another student and their task was to read the story in English.  When I told students to change, one student had to move to the right, and the person at the end of the line went to the front of the line.  Students continued reading with their new partner.  While they were busy doing that, I placed a paper with questions related to the reading on their desks.  I sent them to their desks to complete the questions. After all of the readings and work with the text the previous day, the comprehension and short answer questions were a cinch for the students to complete.

I used the Pedro se durmió story with two classes.  After we finished, I asked for student feedback.  They said they enjoyed helping to create the story with Nearpod. 

Advantages of using Nearpod in connection with storyasking/storytelling:
- All students participated
- Instant feedback on which students understood the story and which students needed additional circling and repetition. I didn't have to specifically call on students to find this out since ALL answered the comprehension questions.
- It is easy to return to earlier slides when more repetition is needed.
- Students really wanted to see ALL their classmates' sketches.  This meant they heard a LOT of examples of verbs in the 3rd person plural.
-  It kept the students actively engaged.  There was not much time for them to "zone out".
- Quiet students were engaged.  
- I liked the ability to share answers anonymously.  If I wanted to share a sentence that was incorrect, I could ask students what they would do differently, but none of the students would know who had written the sentence that was being shared.

Disadvantages to Nearpod
- I STILL...haven't been able to receive help from the Nearpod staff on why I am unable to share the presentation.  (frustrating) Update: I found a way to share the interactive presentation that is on my Nearpod account. If you want to view it and have a copy of it, send me your email (in comments below or a direct message through Twitter if you don't want to make your email public) and I will email it to you.  You need a basic free account with Nearpod in order to access the presentation.OR...try the following link (you must have a basic nearpod account to open it).
  open this link.
- It takes more time to prepare for a story than regular storytelling.
- We are not a 1:1 school, so I need to plan ahead to ensure that I have access to the ipads on a particular day.
- There is a limit to how many presentationsyou can save to the Nearpod account.  If you have the free basic level (silver level), only 30 students can log into Nearpod at one time.
- You need an internet connection.
- Technology, overall, diminishes that one-to-one interaction.

Overall, I liked trying something new for storyasking/storytelling.  I will probably use Nearpod for this type of activity 2- 3x/semester (1 semester = 90 days).  I don't want to overuse it or the novelty will wear off quickly. 

Another story uploaded to Nearpod
If you want to see the full presentation/story, click HERE to see the presentation that I uploaded to my GoogleDrive. (It isn't interactive because it is a powerpoint of the Nearpod presentation.) I took screenshots from the student's view and from my desktop view for the presentation and then added those screenshots onto a powerpoint.  It would be much easier to share if/when Nearpod figures out why my Sharing is not functioning in my account.

I have another Nearpod storytelling presentation that I used with another class on "Larry el vampiro".  If Nearpod can correct the issue with sharing, I'm willing to share that one through the app email with anyone that is interested.

The above is an example for storyasking/storytelling. Nearpod has MANY other uses which I am interested in seeing and hearing how other MFL teachers have incorporated it into their classes.


Sunday, November 23, 2014

ACTFL 2014 - Breathe Life into Reading Document

Several hours ago, I returned home after a busy 3 days at ACTFL 2014.

For those that attended my session with Krista Applegate entitled, "Breathe Life into Reading to Increase Student Engagement and Comprehension" and others that may be interested, I uploaded a document on the ACTFL website with information from the session.  

You can also access it HERE.
If you have trouble accessing it, or have questions regarding the information, please do not hesitate to contact me.  You will notice that I added links to my website or others, because with the exception of 2 or 3 of the activities, I have blogged about it in the past or have directed readers to others' blogs with excellent descriptions.

Enjoy.

Tuesday, November 11, 2014

El Día de los Muertos - Painting Faces & Pumpkins

To teach about El día de los muertos, my lesson plans were probably similar to many other Spanish teachers throughout the US and in other countries - video clips, cultural readings, songs, etc.  (Find more information on these activities in previous posts: Videos & reading materials, and 23+ Activities for Day of the Dead and Halloween

Surprised with my student's face paint!
But this year I added a perspective to El día de los Muertos that I've wanted to do for the last two years - face painting! I did a trial run and painted half my face two nights in advance and was pleased to discover it took only approximately 30 minutes from start to finish.  (see photo on right) Then I convinced our other Spanish teacher to join me, and I spent part of my first period plan with paintbrush in hand and her face as my canvas. :-) 

However, the BEST part was when my first class period of student arrived and one of my students also had her face painted for El día de los Muertos.  

I used to think this would be hard to do, but IT IS NOT difficult.  If you want to surprise your students next year for El día de los muertos, this may be what you need.  I have to add that I have supportive administrators who gave me the green light to teach like this for the day!  

Two of my classes did their own version of "face painting" by painting pumpkins to look like calaveras.  Since there were a limited supply of white pumpkins where I bought the pumpkins, students needed to paint the pumpkins with two base coats of white before the decorating began.  I didn't want to take class time for this so I allowed students to come to my class during lunch and after school.  They students came two days in a row during lunch to work on their pumpkins and, even though I really enjoy talking to my colleagues during lunch, it was really enjoyable to have students in my room and chatting as they painted.  

I have a great photo of the students with their finished "calaveras" but I didn't obtain permission from each of them (yet) to post it on my blog.  If I get that permission, I'll be sure to add it to this post.

Both of these activities would be great ideas for Spanish Club.  


Monday, November 10, 2014

Fluency Writes - the Power of Slowing Down Instruction

It has happened - finally. Two weeks ago I collected a class of student Fluency Writes and, across the board, they were much, much better than I had anticipated.  

The only difference from other years in which the Fluency Writes were "ok", (but without a doubt much better than students could have ever done when I used to teach directly from the textbook in a very traditional manner), and this year in which the Fluency Writes are consistently better written, is that I forced myself to go SLOWer in my teaching and to not rush into new grammar structures and vocabulary words.  When I thought students knew the materials "well enough", instead of moving on, I created yet another story to recycle the words or another activity which included the use of the words in a different manner.

I was a bit concerned when, in mid October, I realized I was at least 3 weeks behind where I was in my lessons from the previous year, but it turns out that the extra time working with the structures resulted in students writing better. 

Below are two writing examples:
 Example A:


 Example B:


These two examples are not necessarily from the top two students in the class. I remember when I took the papers home to read over the weekend, after reading the first 3 or 4 that were really well written, I was expecting the quality to soon go down. After all, surely the majority of the class couldn't write that well.  Wrong - the majority of the class really did write "that well".  

Background on the Fluency Write:
- I had "storyasked" a story similar to the Larry the vampire story; later told them the story about Larry el vampire; they worked with sketches and matched sentences to them; they put the events in order; retold the story to their partner; and helped create a few other stories that used some of the same vocabulary.  
- I then projected a collage of the sketches we had used in class to help remind them of the plot, and students had 10 minutes to write.
- I underlined the correct writing in orange; I used a green marker to underline a sentence that wasn't correct and the following day asked students to work with a partner to decide what would be a better way to write that sentence. I didn't make any (well, maybe a few) marks on the papers after the first 100 words.
- This was their second Fluency Write of the semester; the first one was on a different story.

Tuesday, October 28, 2014

El día de los muertos - Videos & Reading Materials

Three additional resources for El Día de los Muertos:

1. Last weekend I stumbled upon two videos called "Los Thornberrys y El Día de los Muertos". A few days later, Laurie Clarcq, @lclarcq tweeted "we watched the version today w Spanish subtitles. All looked for stereotypes vs actual practices. Blast from their past." 
Here are the links for you & your students to join in the fun too!:
Part 1:  
Part 2:


3. One of the cutest animated short films related to Día de los Muertos is about a little girl that meets her mother when she visits the land of the dead. You can find this video on Vimeo HERE


After I introduce the short film using the MovieTalk method, I distribute a transcript of the short film and read it with the students. I uploaded a copy of the transcript to GoogleDocs, which you can find HERE


Another activity I use for additional comprehensible input is a list of statements about the short film. Students need to find the word(s) in each statement that are not part of the story, cross it out, and replace it with the correct word(s).


I also use a 4x5 storyboard that students use to guide them in a story retell.  (If you want a copy of the storyboard, email me or leave your email in the comments below or send me a tweet @sonrisadelcampo and I'll send it to you.)

UPDATE!!! I received an email by Susann Shultz in which she shared a slideshow that she made to use with the above video. She gave me permission to share it HERE.  THANK YOU Susann!!!

4. For an embedded reading on La Llorona, (a nice choice to follow after El Día de los Muertos) check out Laurie Clarcqs post about Bryce Hedstrom's work on her website Embedded Reading found HERE.

Sunday, October 19, 2014

LARRY EL VAMPIRO - embedded reading & activities in time for Halloween

Some of the activities I use to prepare my Spanish 2 students to read their first novel with past tenses are embedded readings of Larry el vampiro, a MovieTalk the video Vampire's Crown (click here for more resources), and Sr. Wooly's La Dentista song. Embedded readings was developed by Laurie Clarcq and Michele Whaley. Check this BLOG for many examples in several languages.

Below are the activities and materials in my lesson plans that provide comprehensible input of the past tenses based on the Larry el vampiro story.   

The focus words are:  
le dolía la muela = his tooth hurt
quería morder = he wanted to bite
no podía ______r (infinitive) = he wasn't able to ______
  
1. Use sketches of stick figures with a pain somewhere in the body to provide repetitions of what someone WANTED TO DO, but WASN'T ABLE TO DO, because SOMETHING HURT. I used magnets to put a sketch on the board and then I used the circling technique to ask questions about the "person" and their ailment and what they wanted to do but couldn't do.  On the right is a photo of and write what the person couldn't do.  To the right is a photo of my notebook with the sketches I later drew on construction paper to use in class to give you an idea of how simplistic the sketches can be. After all, we're teachers, not artists.

2.  I made a PowerPoint of photos of people and animals with part of their body that hurt. Discuss what hurt the person or animal and what the person wanted to do but couldn't because of the pain. Last year I tweeted that I needed ideas on how to teach this and the ever creative Martina Bex suggested I search for photos of ridiculous or unbelievable injuries to increase student engagement. It worked! I found some eye-catching injuries!

3. Use TPRS to create the story.  I talk about a vampire that had a problem because his tooth hurt.  The students add the details what he wanted to do but couldn't and what he decided to do.

4. Distribute version #1 of Larry el vampiro.  Read with the students. Ask students to give additional information for the story that goes in between #1 and #2, a sentence to go between #2 and #3, etc.  The students copied the sentences that I wrote on the board.

5. Project version #2 and version #3 on the board. As I read, I asked students to raise their hand when I read a sentence that was not included in the previous version.  Since we have been working with the past tenses for a few weeks, I tried to recycle words we've used thus far this school year as well as vocabulary and structures in the upcoming activities and novel.

To break up the reading, I showed them this powerpoint (pictured above) to verbally review the story and for them to retell it. Sketches in the powerpoint are by a talented student, Anna, that was in Spanish 2 last year.

6. I distributed version #4 and they read it with a partner. I collected version #4 to use next semester, and gave the students version #5 for their story folders.  We did several comprehension and reading activities with version #5 to increase their understanding of the text. 

7.  Students had 3 minutes to draw a sketch of an event or description in version #5 on construction paper.  I collected the sketches and taped the first sketch to the board, and without looking at the story, students had to say a sentence that related to the sketch. 

Then I taped the second sketch to the board UNDER the first sketch.  First students had to decide if it depicted the same thing.  If it did, it was removed from the board.  If it was different, they had to say a sentence that described the sketch.  Then they had to decide if it happened in the story BEFORE or AFTER the first sketch. I taped it to the left or right of the first sketch.

We continued in this manner for the rest of the sketches, pausing at times to retell the story using the sketches that were on the board.

8.  Finally, with all the sketches on the board (in a class of 28 students we ended up with 12 different sketches), the students completed a 10-minute fluency write to retell the story.  The sketches provided the story plot to help them remember the events.
  
 It's pure coincidence that I'm at this part of my curriculum when it's nearing the end of October.  Of course that doesn't happen in the spring semester. :(

Sunday, October 5, 2014

Conjugation Charts vs Communicating

This image popped into my mind on my drive home on Friday and today the second image followed.  I was going to wait until I had some inspiration to accompany the sketches, but for the time being, I'll let the images express my thoughts.

VS.


4 - Part Guided Storytelling Activity

Last week I used Bryan Kandel's story about Viernes Negro (found here and other story scripts by Bryan found HERE), even though I took Black Friday out of the equation and made it more general: someone wanted to buy a present for someone else.  The class helped to create a story, we reviewed it, and then I distributed Bryan's version and we read that together.  We also watched an online story I made a few years ago on the website UtellStory (mentioned on this post), followed by reading the script for the story that was also on the previous handout.

After the class story, the two readings, and the online story, I was tempted to move on with new words, but I decided to give the students yet more exposure to the structures with some small changes.  Plus I wanted to experiment with a new idea I had for a 4-part guided storyasking activity.

Part 1. The target structures that the students copied were:
estaba desilusionado/a = s/he was disappointed
le dio = s/he gave to him/to her
lo compró = s/he bought it
la compró = s/he bought it

Then I projected the chart below onto the white board.

 For this story, I wanted both characters to be students in the class.  The first character, (the one that wanted to buy a gift) was permitted to decide to whom s/he wanted to give a gift and, when students gave suggestions for the other answers, s/he had the right to overrule them and not accept their suggestion.

The story in the guided storyasking format was successful in engaging the students since THEY provided the compelling information.  I think the fact that they could see the entire storyline from the beginning, made it easier for them to organize their suggestions and save their best suggestions for last.

As the students created the story, I wrote their answers directly on the whiteboard creating a reading at the same time. This format also helped remind me to pause for short grammar pop-ups such as asking about the LO or LA answers and the O ending in "desilusionado". When we finished, I read the story to them and added small additional phrases in the TL (such as before the "le dio" sentence I added, Alica fue a la casa de Manuel y....le dio el libro a Manuel). 

Part 2. When I was ready to review the story with the students, I tried a different technique that came to me at that moment. I left the completed grid projected on the board with the information, and I retold the story, but with some misinformation.  I told the students to CLAP their hands ONE TIME if I said something that was not correct information. It worked beautifully.  The unison ONE CLAP when I gave wrong information told me they were listening intently for meaning. Plus...there were receiving more input, more repetitions of the structures.  :-)

Part 3.  Students formed groups of 3 and I gave each group a copy of the blank document that I had projected on the board, as shown above.  (Click HERE to access the document.) Their job was to "write" a story by filling in the information as we had done as a class.  In the bottom right square of the chart, they had to decided how the person felt about the last gift and why.
Example of a completed story grid


I gave them 5 minutes to fill in the information on the chart.  Then I gave each group 4 sheets of paper and they had to decide which four parts of their story they wanted to illustrate on the paper.  They actually could have easily made several more illustrations for their story, but I wanted to limit the time spent sketching. When the students finished they paper-clipped their story grid on top of their illustrations and gave them to me until the next class.

Part 4. The following day, I distributed typed copies of the class story from yesterday for additional reading and to help students become reacquainted with the guided storyasking format grid. Then I randomly chose one of the student stories.  I used their story grid to tell the story verbally, (making on the spot corrections if needed). While I read/told the story, the students revealed their illustrations at the appropriate time to match what I was saying.

I have done something similar to this in the past. I'm convinced that projecting the actual grid onto the board so the students can see it when they help create the class story plays a key role in making parts 3 and parts 4 go smoother.

Saturday, September 27, 2014

15 Ideas to Increase Awareness of Your Language Program and Share Your Students' Success


This is one of those blog posts that practically wrote itself in my mind over the last 24 hours. It is a reminder for me, as well as others, to continue the work to go beyond our own classroom and promote our language programs in our school and community, become involved in language organizations, share what we've learned, and encourage others in their journey as world language teachers.

Below are ideas that show the part that we, as language teachers, can play to increase understanding of the process of language acquisition, share our class activities and student-centered lesson plans, and showcase the success our students experience in our classrooms. 

Disclaimer: I have not done all of these. Some, such as #12, are out of my comfort zone but they are still on my radar to (hopefully) complete some day.  By posting the list on my blog, I can revisit it from time to time to check how much progress I have made on completing these tasks.

1.     Willingly share materials and activities with other language teachers at your school. (Share with others also, but ESPECIALLY those at your school!) If you created an activity that provided an opportunity for your students to succeed, don’t hesitate to share it, even if your colleagues don’t teach using the same methods that you do. A ready-made, proven lesson plan, may be a welcome sight to veteran teachers. (Better yet, share your CI- packed emergency lesson plans with your colleagues. Few teachers will turn down that offer!)

2.    Submit a proposal to present at a conference. Write a proposal to share TCI activities and reading strategies that you use in class that help your students to increase their proficiency in the target language. Submit the proposal to present at a local, state, or national conference. If that feels like too big of a step out of your comfort zone, ask a colleague to co-present with you.

3.    Invite your administrators to your class.  Give them a front row seat to the excitement and progress of your students. 
 
4.    Go to School Board meetings.  Let the board members know you are interested and invested in your school. You may be surprised how often discussions at board meetings are directly related to the subject you teach. Talk to your administrator and request an opportunity to showcase your students' language proficiency by having the students present what they are doing in class at the School Board meeting.

5.    Write and submit articles.  The Language Educator and other language publications are always looking for articles from teachers and what they are doing in their classroom that will be of interest to their readers.

6.    Submit a comment in the “So You Say” section of ACTFL's publication, The Language Educator. This is a less intimidating and less time consuming way to reach many readers with information on your methods and successes. 

7.    Write letters to the education department of nearby colleges. Offer to open your classroom to prospective teachers to observe your classes and techniques. An open invitation that welcomes the college students to observe a TCI teacher in action and to see the students’ responses will increase awareness and understanding of TCI and TPRS methods of teaching.

8.  Submit an article to your local newspaper. Write an article about a class project (i.e. a class community service project, a global collaboration project, or the success of your students in their language proficiency). 

9.  Participate in Twitter chats.  Participants in twitter chats such as #langchat both share their experiences and are actively searching for teaching strategies to add to their teaching methods.

10.  Use the power of Twitter.  Tweet links about Language acquisition articles, links to blog posts and Pinterest boards, and links of youtube videos of great TCI teachers in action. 

11.  Participate in a local TCI teacher group and invite others to the meetings.  If one is not available in your area, work with other like-minded teachers to organize one.

12.  Videotape yourself teaching. Videotape examples of storytelling/storyasking, MovieTalk, PQA, circling with balls, and other TCI-heavy activities in your classroom and upload them to a public source. (with permission of your administration and pupils)

13.  Create excitement about languages in the elementary level.  Submit a proposal to your district's administration for a short-term, fun-filled, after school language program for elementary students for "X" number of days.  (Examples: 10 sessions - 2x/week for 5 weeks; or 12 sessions - 3x/week for 4 weeks). If your school doesn't offer languages in the elementary schools, this will create excitement about your program among the students (and parents) years before the students step foot in your classroom.

14.  Blog about your experiences.  The number of language blogs is growing faster than ever, (check this list and my Pinterest board of CI blogs and other language blogs) but NONE of those bloggers have the same experiences than you.  Blog! Many will learn from your experiences. 

15.  Be an active participant on language blogs.  Comment on their posts, ask questions, and write words of encouragement.  When they ask for your ideas, join in on the conversation by offering suggestion and sharing what has worked in your classroom.


Friday, September 26, 2014

Beginning Activities for Past Tense

Yesterday my Spanish 2 students drew sketches of a short story plot to review the structures:
QUERÍA, FUE, LA/LO BUSCÓ, ESTABA + emotion, LO/LA ENCONTRÓ

Below is the explanation of the activity on my curriculum document:


For #4 on my document, I need to add in parenthesis that it reviews (estaba - lo encontró - la encontró). 

I gave the students a 10" x 13" piece of construction and they had 5 minutes to draw the lines to create the 4 boxes and sketch the information in squares 1-4. Then I put the sketches under the document camera and modeled how to narrate the sketches. We talked about 7 of them before and we'll talk about the others next week.

In next week's review, I'll use the sketches with yes/no, either/or and short answer questions.

The activity provided a huge number of repetitions of some high frequency words, more exposure to direct object pronouns used with past tense verbs, and an opportunity for students to provide materials for instruction with their sketches.