Below are simple instructions to get some extra mileage of students' sketches of class stories. I acknowledge that this easy method using Powerpoint may be old news for many, . . . but, in case you didn't consider this option, I'm going to pass along this cool little feature of Powerpoint.
1. Take a photo of your class artist's sketches from one of your class stories. (added bonus - your student artist(s) get positive recognition for their work!)
2. Email it to yourself (or create the powerpoint directly on your smart phone)
3. Insert the sketches onto a powerpoint slide or slides.
4. Insert Text Boxes to number the sketches.
5. In the notes section (the white section below the powerpoint slide), write instructions and add numbers. Be sure to return after each number to allow sufficient space to write sentences. Don't forget to include a space for students to write their names.

6. Go to the Print function to print the slides. Powerpoint has 8 printing choices in the drop down menu. They are:
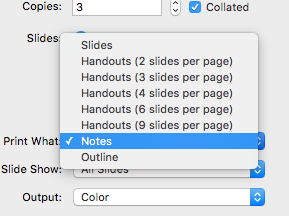 - Slides
 - Handouts (2 slides per pg)
- Handouts (3 slides per pg)
- Handouts (4 slides per pg)
- Handouts (6 slides per pg)
- Handouts (9 slides per pg)
- Notes
- Outline
Choose the Notes option.
You will be able to see a preview of the document on the left (as seen below). If you see that you didn't provide enough space between the numbers, make the adjustments on the powerpoint slide notes section before printing.
 |
| Check preview before printing your document |
7. Print!
With very little time invested, you will have a document with the sketches, a place for students to write their names, instructions, and numbered spaces for students to write sentences. PLUS, since the sketches are on a powerpoint, you can easily project the sketches to talk about them before writing the story.
The teacher can write the sentences on the board and the students can copy the sentences OR the students can work alone or with a partner to write the sentences. It's also a quick informal or formal assessment if you use sketches that you have not used in class.
Below are two powerpoint slides made into a Written Story Retell paper that I distributed to the students.
 |
| Sketches by the amazing artist T.F. |
 |
| Sketches by the amazing artist T.F. |
Another option is for the teacher to type the story sentences directly on the powerpoint notes section as shown in the example below:
 |
| Type story directly in the Presenter Notes section on the ppt slide |
Here is a summary of my plans for the structures SAW, GAVE TO HIM/HER, WAS DISAPPOINTED (which are targeted in the story above). For a more thorough explanation, visit THIS POST from 2014.
1. The class & I created a story with the basic plot that someone wanted to give another person a gift so the character when 3 places, lists what the person saw, that he bought a gift and then gave it to another person, and the person was disappointed with the gift.
I projected the document "Graphic Organizer for Guided Storytelling" and as I told the story, the students provided the names of the characters, where they went, what they saw, to whom the character gave the gift.
 |
| Graphic Organizer for Guided Storytelling |
 2. As were were creating the story, another student was drawing the story. We use the sketched story during our class review of the story because it doesn't have any words and the students are able to hear the target structures again - repetition in context! The illustrations on the right are by the one and only amazing Ava K.
3. We reviewed and retold the story using the sketches above and answered the questions written by the student question writer.
4. I distributed a blank Graphic Organizer for Guided Storytelling to students (pictured below). Students worked in pairs to create details of a different story and then they sketched the story. They rotated around the room and shared their stories with other groups of students.
5. One of the groups created the story with the illustrations shown in the first half of this post. I decided to put those sketches on a powerpoint point slide to get additional reps on the focus structures.
6. The following day I told the story with Scott and Bill as I projected the sketches from the powerpoint on the board.
7. I distributed the document (it was front and back) of the powerpoint slides that had instructions for the students to write sentences about the story.
8. The homework that evening was for students to show their written story to their parents and to read it to them in Spanish.
This post is awesome and has so many great ideas! I didn't know how to print those powerpoint "notes" so that is very helpful to know.
ReplyDeleteThank you.
DeleteI kind of stumbled upon it and then when I figured out how to print the slides with instructions for students, I couldn't believe how easy it was and couldn't believe that I didn't know how to do it before. :-)