I have 14+ ideas listed below, but I'm sure there are many other ideas, and I'll add them as I think about them or as others share how they use them. Really...the small cost of this app is worth it!
2. Students listen as the teacher describes a scene and they re-create it on their ipads.
3. Students receive a printed copy of a feltboard made by the teacher. They listen as the teacher describes it and they circle anything that DOES NOT match the teacher's description. (Ex: La chica llevaba botas rojas. Students circle the black boots that the girl is wearing.)
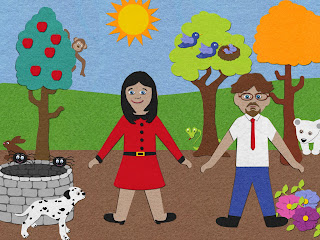 |
| PHOTO A |
 |
| PHOTO B |
6. Practice descriptions such as emotions, clothing, hair color, and prepositions of location using the 9-square grid. (Find an full explanation and ready-made image to download HERE.)
7. The teacher creates a feltboard packed full of different objects (especially useful if they are words that you have recently introduced) and projects it onto the board. After a determined amount of time, the teacher turns off the projector and students write a list of the things they remember seeing.
8. Students use ipads to create several feltboards and email them to the teacher. The teacher prints them or puts them on a powerpoint. On a separate paper, the teacher writes a short summary of each feltboard and students match the summaries to the correct feltboards.
9. As a variation for number 8, the teacher will make a collage of 6 or more feltboards created by the students (a great use for a photovisi collage explained HERE). Project the collage onto the board. Instead of a full summary of each feltboard, the teacher can read, or write, sentences about each, mix the sentences, and the students search for the feltboard that each sentence matches.
10. For upper levels that have a better command of the language, the teacher creates a feltboard scene as a starting point for a story, and students develop the story.
Variations:
- The feltboard scene is the MIDDLE of the story. Students write what happened before the scene and what WILL happen next.
- The feltboard scene is the END of the story and students write what happened to lead up to that point.
11. The teacher creates a feltboard scene and makes copies for the students. Then she reads a story that has nothing to do with the scene except that some of the vocabulary in the story is the same as the felt pieces. Ex: The feltboard may show a family in the city, but the story is about a woman that always forgets things. As the students listen to the story, they cross off the items that were mentioned in the story. Great listening comprehension! At the end of the story, students can list the items that WERE NOT MENTIONED in the story.
12. Sometimes in my upper levels for a fun activity, we create a story by sitting in a circle and each person adds a sentence to the story. A variation of this can be done while illustrating it with the feltboard as the students add a sentence. OR...
VARIATION: What I like better is that the teacher is the one that has the ipad with the feltboard app, and it is hooked up to the projector so students can see it. The first student says a sentence. The teacher adds an item and the next student must weave that item into the story. This could be quite an interesting variation.
13. The teacher creates a several feltboards to depict a short story. Email the feltboard pictures and put them into a 4 square grid on a powerpoint. Students guess the order of the story before they hear the story. They write or say a logical story narration to justify how they ordered the pictures.
VARIATION: Students read the description written by the teacher, match the pictures to the 4 different parts of the story. Then put them in a logical order.
14. A basic activity: the teacher creates a feltboard with a large number of felt pieces and copies it or projects it onto the board. Students work with a partner or in teams, taking turns saying a sentence that includes one of the felt pieces.
VARIATION: Students simply say the name and color of the felt piece and cross them off until all the items have been identified. (not a very exciting use, but hey, I'm running out of ideas).
15. Assessment with Photo #1 (from #4 above). Project the photo onto the board. Either the teacher reads a statement about the picture or distribute a paper with sentences about the picture. Students write if the statement is TRUE or FALSE. Option: if false, students correct the statement to make it true.
16. Assessment with Photo #1 and Photo #2 (from #4 above). Student write sentences that describe (x) number of differences between the two scenes.
What other ideas do you have to SHARE?
Just when I thought that I was done with my lesson plans for the week! I am downloading the app right now so I can practice on the teacher side. We have a department set of iPads and I have a feeling that this app may make our wish list of apps that we would like to purchase. Como siempre, ¡gracias por compartir!
ReplyDeleteHi Barbara!
ReplyDeleteI know all about those last minute changes on lesson plans because of something I saw online. One thing that I like about the app is that even students without artistic abilities can "draw", plus..."drawing" is done quickly.
One disadvantage to the app: it doesn't have is a BACK button! Grrr. How did they miss that? Hopefully a new update will include it.
Have fun with your new feltboard!!!
We really need to get together and share ideas in person since we're in neighboring districts. I'm adding that to my list of goals (things to do) for October. ☺
Cynthia