Monday, May 23, 2016

How to make a Billy la Bufanda cake

Billy la Bufanda
Spanish students in our school district are introduced to Billy la Bufanda and Sr. Wooly in middle school.  In the high school, Billy la Bufanda and the two other songs about Billy are always a crowd favorite. 

Therefore, when I wanted to surprise my Spanish 4+ class today with something special, Billy la Bufanda came to mind.  I know my students like food and they like Billy la Bufanda, so why not make an edible version of Billy?

I asked my daughter to help brainstorm how to make an edible Billy because she is the queen of creative desserts.  Then I searched on Pinterest (no edible Billy's to be found) and decided it was high time that Billy make an appearance in cake form.
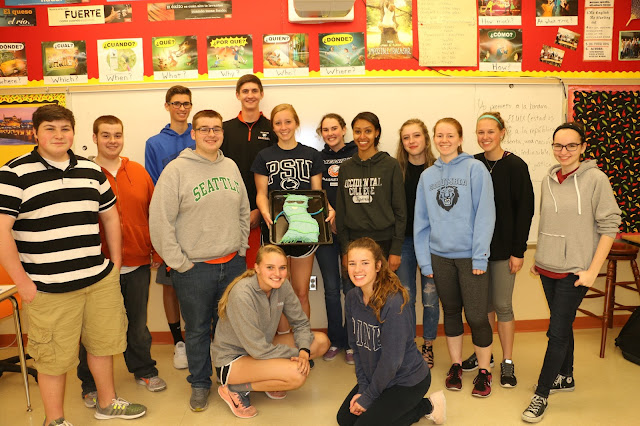

Spanish 4+ students and Billy la Bufanda
Needless to say, the students were surprised and after one mandatory photo, they didn't hesitate to cut Billy (oh no) and enjoy the tasty treat.

Isaac is the brave soul that cut Billy.
If you, or your students, are interested in making a Billy la Bufanda cake for, follow the simple instructions below and you'll be ready to share the treat in no time.

Items needed:  heavy duty cardboard, pencil, scissors, hot glue gun, heavy duty aluminum foil, cake batter, icing, blue, green, and black food coloring, colored Twizzlers.


How to Make a Billy la Bufanda Cake

1. Watch the short video "How to Make a Custom Cake Pan"

2.  Decide the size of the cake you want.  I wanted my cake pan to fit onto my oven's drip pan so I sketched Billy to fit within those restraints.  (My oven's drip pan measures 19" x 14".)  You also need to remember that the cake pan must fit into your oven.  If you want a really big cake than you can make two separate pans and join the parts of Billy together when you decorate the cake.

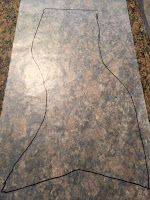
3.  Sketch the outline of Billy on a large piece of cardboard and cut out the outline.  I got heavy cardboard at the grocery store when the person stocking shelves was breaking down the cardboard boxes. (Note: I sketched Billy as he appears online, knowing that I was going to flip the cake two times, so I didn't need the inverse of Billy.)

4. Put the cardboard shape of Billy on a sheet of wax paper and trace the form onto the wax paper. Set aside until step #8

5.  Cut additional strips of cardboard, 2 inches wide.  Use a hot glue to glue the strips perpendicular to the outline.


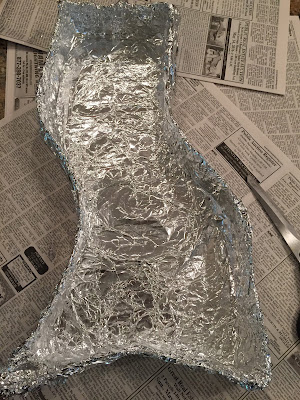
6.  Put a large sheet of aluminum foil under the cardboard outline and fold the foil up and over the glued sides. Use additional sheets as needed to cover the outside bottom of the cut-out form and to fully cover the 2-inch sides.

7. Tear off a 2nd large sheet of aluminum foil and place it in the inside of the form and press it on the bottom and the sides of the cake form. 


8. Place the wax paper (from step #4) inside the cake pan form. Spray it with Pam. This will make it easier to remove the cake from the pan after baking. 


9. Place the cardboard/aluminum foil cake pan onto the drip pan.

10. Mix the cake ingredients, use a boxed cake mix or make it from scratch. Pour the batter into the cake pan, leveling the batter to fit in every corner of the pan. Bake according to directions. 
*Note: If using a boxed cake mix and your Billy cake form is similar to the size of mine, you will only need 1 cake mix.


11. Remove cake from oven and allow to cool on a wire rack.

12. Take a knife around the edges of the pan and gently push the cake edges toward the cake and the aluminum foil sides away from the cake. This is a big advantage to making your own cake pan with aluminum foil because you can bend the foil away from the cake making it easier to remove from the pan.

13. Place a wire cooling rack on the top of the cake and flip the cake upside down.

14. Ease the cake out of the cake pan.


15. Carefully lift off the wax paper from the cake.


16. Immediately, place the pan or sheet on which the cake will be decorated, on the bottom of the cake and flip the cake the second time.  Allow time for the cake to cool.


17.  Mix or buy icing.  Divide the icing and put it into 4 different bowls.  Use food coloring to dye the majority of the icing blow. Save a little icing to dye green (for the stripes on Billy) and a small amount to dye black (for Billy's sunglasses), and leave about 1-2 tablespoons white (for Billy's teeth). Put blue icing on the entire cake and sides.  Use a decorator's tip to pipe the green strips on Billy. 


18. Take a small knife and gently scrape off the blue icing where you want to add the black sunglasses and add the black icing there.  Do the same for where you want to add the icing for Billy's smile.

19. Use blue and green Twizzlers for Billy's arms and hands. Cut the blue Twizzler's the correct length for the arms. Cut 2 small pieces of a green Twizzlers to the shape of Billy's hands. Use a knife to cut strips of green Twizzler's for the fringes on the scarf.

20. Share Billy la Bufanda and ENJOY!

*Update: I forgot to add Billy's eyebrows!  To add them, use either green Twizzlers or the green icing.
Wednesday, May 18, 2016

Take Care of Yourself

Note: This blog post focuses directly on you, the teacher, and not on the students, the curriculum, teaching methods, etc. I feel I need to write this blog post before my mind will be freed up to return to writing other posts related to teaching. Please take this advice to heart and act upon it if you realize it pertains to you!

Have you ever postponed going to the doctor because you didn't want to take off a day of school? Teaching is a demanding job, but writing lesson plans, valid lesson plans and not just fluff, for a substitute teacher for your classes is, in my opinion, a more demanding job.

I have 3 different preps and I hate missing a day of school because:

1. I feel like we are crunched for time, as it is, with our schedule (we only have 100 hours with the students per language level)

2. Three different preps with 70 minute classes! That says it all. Preparing substitute lesson plans for 1 prep takes time; preparing sub plans for 2 preps is twice the work; and sub plans for 3 preps, well, I usually decide that it is easier for me NOT to miss school and throw out the idea of going to any appointments. Sure, I could have the students watch a movie, but....did you read #1?

3. When I make substitute lesson plans that are solid, it usually requires me to respond, in some format, to the work that students did after I return to school the next day. In other words, I have additional work waiting for me when I return. (I know, there are emergency and substitute lesson plans you can buy online, but they don't always match up for what I want for my students.)

However, I am here to tell you, maybe to admit to you is a better choice of words, that the above thinking is flawed. The best thing that teachers can do for their students is to take care of themselves. If it means making substitute lesson plans that may not be up to par to what you really want, then so be it. Cut yourself a break. Think of the many other professions in which employees are able to easily take a sick day and aren't required to make plans for others while they are absent from work. 

Do you get the picture? YOU need to take care of yourself, first! As teachers, there are many times that we put our jobs and our students first. That's noble and that's good, but when it comes to our health, we shouldn't be doing that.  

If, by chance, someone tells you that since as a teacher you "only" work 9 months, (gross misconception by those not in education; they also think we work 7 1/2 hr days; teachers know that is not true), you should wait until the summer to schedule all your doctor appointments, then simply smile and move on. If you're organized and plan ahead, scheduling those screenings for the summer is a good idea but, if you have postponed and delayed appointments already, don't fall into the trap of allowing someone trying to shame you into delaying appointments until the summer.  

I realize I am writing this in mid-May when there are only days, or weeks remaining in the school year.  However, it's possible that when you read this, it will be months after I wrote it.  In that case, summer may not be a few weeks away and in that case, don't delay. You need to come first.

If you're reading this and you are feeling a little bit of guilt - GOOD! That's what I'm aiming for because I want to push you, or guilt you, into action.

It is easy to find lists of preventive health care screenings on the internet.   
Follow this link: Preventive Health Screenings for a list of screenings, and then visit your primary care physician and seek her/his input and advice. 

And..I'm not an expert on insurances, but I think it is the norm for insurances to pay 100% for preventive health screenings. 

I'll step down off my soap box now.  I'm not sure what else I could say to make it more clear to you that it doesn't matter what your abilities are as a teacher, if you are sidelined by medical problems that could have been nipped in the bud if you had gone to the doctor for your preventive health screenings.

Take care of yourself. Your students, their parents, and your administration, need you to do that. No exceptions.  :-)

Tuesday, May 10, 2016

World Language Technology Institute

Leave it to Noemi Rodriguez to organize another grand event for World Language teachers, called World Language Technology Institute.  (She also was a key organizer and driving force behind last year's first ever @edcampWL.) The World Language Technology Institute is described as "A week dedicated to empowering World Language educators to create a variety of technology-based activities and assessments for immediate implementation." 

The World Language Technology Institute takes place on August 22 through August 25, 2016, at Pascack Hills High School in Montvale, NJ.  There is a long list of seasoned presenters that are excited to share their knowledge and success on what they are using with their students in their world language classroom. The sessions are divided into three levels of technology experience/comfort (beginners, intermediate, and advanced), for both elementary and secondary teachers, even beyond to college level.  Each day is assigned one of the 3 modes of communication, Interpretive, Interpersonal, & Presentational, with the last day's focus on IPAs.

Click HERE to take you directly to the session schedule and descriptions of the sessions.

Registration is open now.  If you have additional questions, you can contact Noemi on Twitter, @SrtaNRodriguez or @WLTechinstitute or by email at: info.wltechinstitute@gmail.com