Showing posts sorted by relevance for query alma. Sort by date Show all posts

Monday, November 21, 2011

Using Videos with TPRS

Last week when I was driving home I realized that my students in Spanish 1 knew almost all of the words necessary to understand an interesting animated video that I had used earlier for a conversation activity with my Spanish 4 students. I decided to pre-teach the remaining words and then used TPRS to explain and act out the story.

****UPDATE****
Update - ALMA continues to gain popularity! Below are links to additional ALMA activities recently created (Dec. 2012-Jan 2013) by other teachers. All updates can be found on Laurie Clarcq's amazing "Embedded Reading" blog.  
a - Click HERE to see @fravan amazing activity on ALMA.
b - Click HERE  for an Embedded Reading (created by Nina)
c - Alma LECTURA (created by Doug Stone)
d - Alma Repasito  (created by Doug Stone)
****UPDATE****

1. The two stories used to pre-teach some of the vocabulary and the ALMA story are in the document below. For the Osama story, we made the story in class and the following day I distributed the paper so students could fill in the blanks as a review and then we wrote the ending of the story.


2. After the pre-teaching of vocabulary was finished, I told the story about Alma using TPRS, circling technique, w/ some acting. After I told a small part of the story, I paused so students could sketch the scene. They sketched 6 different scenes. Then I showed the movie "Alma" and stopped the movie right before Alma touches the nose of the doll, because, of course, we ran out of time to watch the ending.


3. Since I stopped the video before Alma actually touched the doll's nose, the students' homework for the night was to sketch what they thought happened. The next day, one of the review activities was to put their sketches under the document camera and students had to think of a sentence or sentences to describe what was going to happen. The sketches were also handy as a review of the story - partner work for retelling usually works great.

4. I also made a photo collage of parts of the story. Photo collages or sketches are great for reviewing because I will say a sentence and then the students tell me which picture that action occurred. Or, sometimes as a class we retell the story frame by frame using the photo collage or a student's sketch.
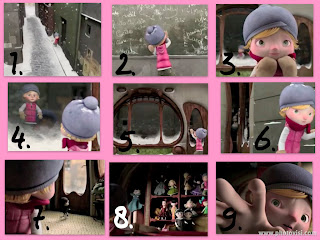
view video at: http://youtu.be/irbFBgI0jhM

5. Tomorrow we will do 3 Cloze activities as another review of the vocabulary and events in the story.

ALMA - Cloze Activity #1

ALMA - Cloze Activity #2

ALMA - Cloze Activity #3

UPDATE: Click HERE to find additional ALMA materials (they're awesome!) that Martina Bex created in December 2011.


I love finding short videos to use in the class. The students like it because it changes things up for the day and I like it because it keeps their attention which means more repetitions with a captive audience.

Next year when I use this story, I'll pre-teach more clothing vocabulary first! That was a missed opportunity.

**Even though many people recommend using past tenses from the start, I am in my first semester of only TPRS with my Spanish 1 students so I'd like to feel a bit more comfortable with the TPRS method before I teach the past tense from Day 1.**

Wednesday, November 23, 2011

An Additional Activity for Alma Video

This is a hard copy of the on-line CLOZE activity to review the Alma video. When we did this activity in class, I first gave the handout of the cloze activity for them to complete. To go over the paper, the students read their answers as I used the drag and drop on the online site to insert the correct answers.

Hard-Copy of Cloze activity to distribute to students

Saturday, October 17, 2015

PSMLA 2015 - 1,2,3 Movie Talk Presentation

Today my colleague, Krista Kovalchick, and I went to PSMLA at Valley Forge, PA, and gave a presentation on Movie Talk.  Below are links to websites that we mentioned in our presentation.

 Additional Resources mentioned in our presentation:

Movie Talk blog posts; find videos and materials to use related to the movie talks from 2011 to present. They include: Alma, El monstruo del armario, Blind Date, Hit & run, El vampiro y la dentista, Sheep in the Island, Toilet paper/ipad commercial, La niña que recuerda, and La Dentista. 

Embedded Reading website by Laurie Clarcq

Pancho Camacho game - explained by Alina Filipescu w/ video demonstration

Movie Talk videos on Pinterest (The link will take you to my Pinterest board, but don't stop there, SEARCH Movie Talk and you'll find a lot of Pinterest boards!)

Movie Talk data base by Christy Miller
 

Tuesday, November 27, 2012

Weather matches the lesson

File photo from winter 2011-12
I planned today's lesson before our Thanksgiving break, which was a week ago. Some of the new structures for today included: 
hace frío = it's cold
hay mucha nieve = there is a lot of snow
está nevando = it is snowing
We also had 3 new clothing words: el gorro (hat); la chaqueta (jacket) & los mitones (mittens).

As luck would have it, the first snowfall of the winter season greeted us this morning and it was still snowing when I taught both my Spanish 1 classes.

Because I'm feeling crunched for time, we didn't stray much from the story I had previoulsy typed during the "story-asking".  At one point in the lesson, I decided to pause and ask the students to think of reasons why the boy in the story is surprised (está sorprendido).  They worked in groups of 2 or 3 to think of a sentence and then shared them with the class.  I was so impressed with their answers because the majority of them were complicated, compound sentences filled with adjectives and prepositions, AND they were grammatically correct.  

At the end of the story they each wrote another sentence on the paper with the typed story to say why the boy was surprised again.

This link will take you to the story if you care to read it. The words in this lesson will help prepare the students to watch the video ALMA which I showed to my Spanish 1 students last fall and was a big hit with them.  We need one more day of learning several vocabulary words and then we'll be ready for video....finally!


Saturday, September 7, 2013

How to Make Digital Collages

I use collages often in class (such as with Alma, and El vampiro video).  The visuals make it easier to stay in the TL and to keep the input comprehensible.  Last year one of my readers said she wanted to learn how to make the collages but she felt she wasn't very "techy".  Between several emails and a tutorial screencast that I made for her, she was able to successfully make a collage.
Below are similar directions for those that need help on how to make a collage from screenshots of a video from YouTube or other resources.

1.  Find a video that matches your target structures or one with which you want to use MovieTalk. In order to not violate any copyrights, I am using a video about making pie crusts as the example: not language related but it'll work for the example. 
2. Take screenshots during the video. On Mac, press SHIFT + COMMAND + 4 and then line up the cross hairs to outline the part of the screen you want for each screenshot. My settings put my photos directly onto my desktop. (To make screenshots with a PC, google "how to make screenshots with a PC").

3. After I have the screenshots I need for the collage on my computer desktop, I number and title them so I can easily find them to upload.

4. My favorite site to use to make collages is http://www.photovisi.com/  Click on CREATE and choose a template. You do not need to make an account to use the websites, but many templates are only available if you have a (free) account.

5. Click on +Add photos (orange tab) to upload photos.  If you choose a template that has room for nine photos, you can only upload a maximum of nine photos. The website will automatically place your photos in the template. When you click on each individual photo, you can move it, resize it, or delete it.

6.  I like to have a color background separating the photos so I click on each one and make it smaller. Then I click on "Change background" to choose a color that goes well with the photographs. 


The background options on the Photovisi website includes pattersn, colors, or you can choose a background from your own photo gallery.


7. Click on "Add Text", then choose a font, color, and type your text.Click on "Add text to collage". After it is added you can click on it to resize it and to move it around. 
If you want to make your text pop even more, type the text in one color, add it, then type the exact same text in another color, add it. Put one of the identical colored texts slightly above, below, to the side, etc. of the first text and it will give it a shadow effect. 

8. Click on "Finish". The share button will enable you to email your collage, to post it directly on Facebook and other options.  There is also a download button to download it to your computer. If you mail the collage to a friend, keep in mind that the website only stores the collage for 4 days, so I strongly suggest that you download it to have a permanent copy.

9. Here is my finished collage:


 10. I project the collages onto the smart board and use them:
- for student or teacher retells of a short film
- as a pre-activity of a short film
- for assessments in which I say a sentences and students write the number (or letter) of the photo that I am describing
-  a collage made with online visuals and leave the last few squares blank for the students to write an ending 
- cultural collages, for example, I have one of food in Mexico
- famous Hispanics, explain for what each person is known 
- how-to collages, great to reinforce commands
- and many other possibilities

There are many other collage websites available, but I use this one because I think it is very user-friendly, plus it is free.