Showing posts sorted by date for query story asking. Sort by relevance Show all posts

Sunday, October 20, 2019

10 Uses for Revista Literal: A FREE Spanish Resource

If you're a Spanish teacher and you haven't heard about Revista Literal yet, then I'm here to introduce you to this incredible resource.  Revista Literal is the brainchild of Martina Bex, a language curriculum specialist and also the founder of The Comprehensible Classroom, the SOMOS curriculum, Garbanzo language website, and creator/writer of endless resources on TeachersPayTeachers (not to mention a national presenter and keynote speaker.  I stated above, it is a FREE resource. According to the Revista Literal website, "Revista Literal is a monthly publication for beginning Spanish language learners written by Spanish language learners. Each month, readers submit short, original stories for publication." 

After students submit their stories, Martina invites native Spanish speakers to proof the stories and then she adds glossaries for the stories and volunteers add the English translations to the glossaries. After the stories are proofed and have glossaries, Martina places the stories in an online format, creates a title page listing the stories for the month, and adds graphics to the stories. She credits the writers of the stories using the students' first name and town and state, and credits the volunteer proofers and glossary writers. Then she publishes the stories online as a free resource for Spanish teachers. 

Then, voila, you have a free resource that comes to you each month to use with your students. Some of the stories are written in the present tense and others in the past.

Here are 10 ways to add the stories to your lesson plans.

1. Partner Reading. Students pair up with a partner and read the stories to each other for X number of minutes. This even works for your novice readers because of those beautiful glossaries for each story.

2. Extra Reading Resources. If you have students or parents asking what is available for a student that is struggling, or on the other end of the spectrum, a student that wants to continue learning beyond the classroom, tell them about Revista Literal. I download the resource (yes, you can download it if you prefer to read it on paper) and add it to our learning managagement system so it is always available to students.

3. Bell-ringer. Project a story from Revista Literal and ask comprehension questions for students to answer. Last week I projected the story "EL LABORATORIO" and alongside where it was projected I wrote the following questions for my Spanish 1 students to answer in English.

ANSWER IN ENGLISH:
1. Write 2 descriptions for Dave.
2. Write 3 facts about his job.
3. List 4 things about Karen.

Although I only asked for 2 descriptions for Dave, when I went over the answers with the class and a student responded with 2 of the descriptions, I asked what other descriptions were mentioned. I did the same with #2 and #2, Then we read the end of the story together.

4. Sub Plans! Use your imagination on how you can make your life easier when you need to be absent from work. Revista Literal will continue to provide comprehensible input to your students during your absence.

5. Running Dictation. Read Martina's explanation of Running Dictation here. If you want to put a new spin onto running dictation, use an online crossword puzzle creator and make a crossword puzzle of information from the story. You'll get double-whammy of reading out of the story because students read the story from Revista Literal (in the hall or wherever you have it posted) and then have to read the crossword clues at their "home base" in the classroom. 

6. Chronological Order. Pull some sentences out of the story that can easily conform to a timeline and have the students predict the order of the story. Obviously, do not read the story with the students before this. If you want to do this as a group, show (tape to the board) 2 of the sentences and ask students which one is first in the story, then add another sentence and students decide the placement of the third sentence. Add another and continue; students can change the order as new sentences are added and the story order becomes clearer (or they think it becomes clearer). 

7. Find It. Project the story, read it together with the students, then play Find It with flyswatters as explained here

8. Mosaic Story(a). Do this before reading the stories with the students. Pull sentences from 3 different stories from Revista Literal and list the sentences on one paper in random order. Write a brief description of each of the stories (brief!-brief!-brief!) in English (don't mention any of the characters in the story by their name in the story), and the students' task is to determine which sentences go with which story.

9. Mosaic Story (b). Again, do not read the story with the students before completing this task. Pull sentences from several stories and have the students create a story using the sentences. You could tell students they can omit X number of sentences and/or you can tell students to add sentences to make the story flow. The Mosaic Story (b) activity will provide your novice high and intermediate students an opportunity to create with the language.

10. Go crazy! Students use any sentences from the entire monthly issue to create a short story. Limit the students to 10 sentences or whatever number works best for you. Come to think of it, THIS would be a good emergency sub plan to have available when you need it. 

Obviously, since Revista Literal has stories, there are a boatload of possibilities. 

Thank you Martina for making teaching a bit easier.  ❤️


Thursday, August 29, 2019

First Days of School (Back) in the Spanish 1 Classroom

It's been 7 years since I taught Spanish 1, but I'm happy to report that I'm back in the Spanish 1 classroom and enjoying the newness of the language to the students and the way they are soaking it up.

Last year I asked my administrators if I could teach a few level 1 classes again to revisit the curriculum. They obliged me and for the fall semester I have three Spanish 1 classes and one Spanish 4 class. 

I searched for and found my old lesson plans on my computer, and I was obvious they needed some serious updating. I pulled a little something from here, an idea from there, and voila, the first four days went 10x smoother than I could have hoped for. It went so well, in fact, that even though I haven't been documenting much on my blog in the last year or so, I felt I had to share in case  the lessons may be useful to others. 

Following is a summary of my plans for 70 minute classes for Spanish 1.

DAY 1

1. First day intro, brief syllabus/expectations
2. Explained call back: Hola Hola Inca Kola (idea from Annabelle Williamson)
3. On construction paper, students wrote their name and something they want
4. Teacher questions in Spanish and students answers in English or si or no

    I questioned a few students about their cards, asking them what they want, showing it to the class, asking if they already have that item, which other students have that item, how many/much of the item they want, etc'
     In the first class, I started with a student that had drawn the money symbol. Just as in normal conversation, the student's answer led to another question, followed by another answer, which took us in another direction, and on and on it went. I only discussed the information on 3 students' cards because the questions and answers flowed so easily and the students were engaged. At least one student in the other classes also drew money so I asked similar questions in those classes too. 
     Keeping the conversation in Spanish involved framing my questions with cognates, writing key words in Spanish & English on the board, pointing and pausing at the question words, sketching, clarifying, comprehension checks, and all the other tricks we have to remain in the Target Language while still be comprehensible.
     The conversation allowed for many repetitions in context of the words: quiere(s), tiene(s), es, está PLUS interrogatives

5. WRITE & DISCUSS: I asked students questions about the conversations and wrote the information on the board. We read the sentences when finished (4 or 5 sentences) and then students copied it into their notebooks.
BRAIN BREAKS (2-3)

DAY 2

1. Chatted about Day 1, the first day of school, for 10. Once again, it was in the TL. I asked students what classes they have, recycling tiene (has), which class in their opinion will be the easiest or the most difficult, who the teachers were, etc.
2.  I asked students to READ the sentences we wrote yesterday and I wrote them on the board. We reviewed the information in the sentences but other information that we talked about yesterday but did not include in the written sentences, we READ the sentences in English, asked students "which word means X", 
3. Discussed a few other student cards (quiere)
4. WRITE & DISCUSS the new information
5. I used SpanishPlan's powerpoint story "El niño quiere un dragón" for PictureTalk. HERE is the free download on TPT. More recycling of the words quiere, tiene, está and introduced dice. We read each of the slides except the last one. I saved the surprise ending for tomorrow.
BRAIN BREAKS (2)

DAY 3

1. Warm-up:  

2. Re-read the powerpoint "El niño quiere un dragón"
3. Watched the short video and asked students to explain the surprise ending.
4. Read the last slide of the story "El niño quiere un dragon"
5. Discussed last two slides from SpanishPlans ppt - how much English was used?, what helped them to understand?, etc
6. OWI (One Word Image) explained HERE
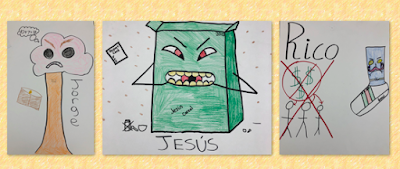
7. WRITE & DISCUSS the OWI. Below are the students' masterpieces. 😊
BRAIN BREAKS (2)
DAY 4

1. Warm-up: I posted a OWI sketch on the board from another class for students to refer to along with 10-12 sentences about the character. They chose 5 Spanish sentences from the descriptions to translate to English. When completed, I read the sentences in Spanish, one by one, and asked for volunteers to tell me in English the translations of the sentences.
2. Reviewed the class' own OWI. If we didn't complete the information that we created yesterday, we did that in WRITE & DISCUSS format. For the class that completed the WRITE & DISCUSS yesterday, we created a story WHY Rico el calcetín was sad and then did a WRITE & DISCUSS.
3. Nineteen years ago (😊) I made two maps of Mexico & Central America & the Caribbean and of South America on poster boards and made Velcro labels of the names of the countries & Puerto Rico and bodies of water. I put the poster of South America on the board and randomly distributed the labels to students. Any student that thought they knew where their country label belonged on the map went put their label on the map (only 1 or 2 per class did this). Then I gave them hints on the answers (examples: think of Argentina as LARGEntina, Uruguay begins with U just as the word "under", as "tucked under" does and Uruguay is tucked under one part of South American; Colombia starts with "C" just as "conectado" does and Colombia está conectado a América Central) and other fun helpful hints. 
     We continued with the map of Mexico, Central America, and the Caribbean.
     Teaching the map information in the Target Language is easy. Just remember to slow your rate of speech, write words on the board they don't know (example: país=country; frontera=border; isla=island, norte, sur, oeste, este, isla) point to interrogatives and pause;  
     Recyled tiene, está, es, and a few others that have naturally crept into our discussions the last few days such as pero, con, también   

BRAIN BREAKS - 1 (moving around when labeling the countries provided a mini-brainbreak for students.


I deem this week in Spanish 1 a success! I am so proud of my students. They were engaged and I am delighted with the amount of growth I've seen in that short period of time.  
As I said, I'm sooooo proud of them. 👍🏼

Things to keep in mind:
1. Staying in the target language is definitely doable if you are committed to slowing your speech, adjusting your language and vocabulary for the level of students, pointing and PAUSING - do not forget the pausing please; writing words in Spanish and English, short verbal clarifications/comprehension checks;  

2. Brain Breaks - If you ARE successful in staying in the target language, don't fool yourself into thinking the students can maintain that engagement and focus indefinitely. They N-E-E-D a brain break. It is worth it to pause for 1-3 minutes because they can refocus much better. 

3. If you forget to include brain breaks because YOU are so into your lesson, assign the job to a student to let you know when it is X-o'clock and I can guarantee you the student will not let you forget the brain break.  :)

4. WRITE & DISCUSS is POWERFUL; even more so, in my opinion, when the teacher writes the sentences first, with input from the students (allow them to answer in English but you write in the TL), and only after you finish writing (and reading it and "discussing" the text) should you allow the students to copy the text.

5. OWI (One Word Images) provide rich vocabulary for students and you will get  student buy-in and ownership of the character. ENJOY the process and laugh with the students and encourage and appreciate their creativity.

6. LOOK the students into their eyes. This is my 19th year of teaching and finally...I am able to consistently accomplish this. Making connections is 10x easier when you meet this goal.

7. "Haste makes waste". You can't rush language acquisition, but you can provide comprehensible, enriching language experiences for your students. Guard those precious moments of instructional time and use them to their fullest!


Saturday, July 20, 2019

One Word Images & ChatterPIX PLUS App Smashing

I stumbled across an app earlier this year that when combined with One Word Images (OWI were originally created by Ben Slavic. Read about & watch a video of a OWI on Mike Peto's Blog) will provide various possibilities for World Language teachers. 

The app is called ChatterPix and it is available for IOS devices AND Android devices. Better yet, it is FREE! As soon as I saw the app I couldn't wait to add it to my presentation "Make Technology Count in the CI Classroom" for #iFLT19 in St. Petersburg, Florida, to share it with other world language teachers.

The ChatterPIX app allows you to upload a photo, draw a line for a mouth on a person or on any object that is in the photo, and then you record your voice and the "mouth" moves as you are recording.

When I was experimenting with the app and searching for photos on my camera roll, I came across a photo of a OWI that my Spanish class had created and the idea to use the app on the OWI was born.

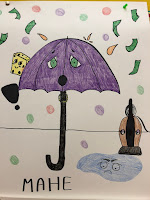
On the right is a photo of the OWI my Spanish class created. To summarize, Mahe is an umbrella that is afraid of rain and has a friend that is a sponge. (If you're wondering how did we decide on a name such as Mahe; students couldn't agree on a name so I asked four students to tell me a letter of the alphabet and from those letters I created the name Mahe. 😂)

I uploaded the photo to ChatterPix and added the voice.


Some of the uses when combining ChatterPIX with OWIs are:

- teacher creates the recording for students to access for additional input
- teacher creates the recording with the OWI asking true/false or short answer questions for students to answer
- teacher creates the recording with a few changes to the details/story; students  find the differences between the recording and the original class story
- students create a recording as if they were the object; summarize information about the object
- students create a recording as if they were the object; add new information about the OWI (character)


In general, students can use ChatterPIX for presentational mode, especially for students that don't want to have their own photo on the end product. The finished products can be uploaded to your school's LMS (Learning Management System, such as Schoology, Canva, Edmodo, etc.)

- students draw a character from a novel the class is reading and record as if the students are the character; what are his/her thoughts on what is happening?; what does he/she hope does/doesn't happen?; how does s/he feel?
- choose a painting and have the painting tell what is represents (great for art "units")
- teacher uses photo and records a voice; students decide if what the person or object says is logical or illogical in reference to what is happening in the photo
- students create a comic strip and upload it to a powerpoint or googleslides; make characters talk with ChatterPIX

Below is an example that MadameMoran tweeted which uses ChatterPIX. (#greatmindsthinkalike) 😊

Next...

If you want to step into App Smashing, try combining a app or website that removes the background in photos of people (and objects if you're willing to pay extra or do extra detailed work), then add a new background for the people in the photo, and make either the people talk with ChatterPIX or pick an object in the photo to talk TO the people. (Thanks to Krista Kovalchick for permission to use the photo with her and me.)


Below is a screenshot of a slide from my Tech Presentation at #iflt19 on Appsmashing with ChatterPIX and the website Removebg.com followed by the steps I followed to create the above video.


1. Take a photo. Make sure there are not other people in the background!

2. Upload the photo to removebg.com and remove the background. Download the photo from the removebg.com website.

3. Choose another photo to which you want to add the person/people on the downloaded file from removebg.com. (My friend, Karen, sent the photo in this step when she was at Epcot and I was at in-service. Years ago I was at Epcot but not with Krista, the woman in the photo with me.)

4. Layer the edited photo from removebg.com to the new background.

5. Upload the new photo to ChatterPIX. Choose a person or an object to animate with a voice. Download the video with voice recording to your camera roll or computer for use in your world language classroom.


This website takes all the work out of removing backgrounds. I used it with ChatterPIX but I'm sure you'll find uses for it for other activities in your World Language Classroom. Or, have fun using it and surprising your friends with the photos. After all, having fun with tech shouldn't be limited to our classrooms!!


Tuesday, May 28, 2019

Student Engagement & Charlala.com in the WL Classroom

Don't you love it when someone creates a new tool that, as soon as you learn about it, your mind starts thinking of numerous ways you can use it in class? That's what happened when I first saw a tweet about the website Charlala.com

I predict that after learning about Charlala.com you are going to wish you had more days of school with your students. Yes - Really! 

Charlala.com is a website created by Chris Hammer, a world language curriculum specialist and a grade 2-8 Spanish teacher. Charlala.com has several features but the one I'll focus on in this post is the DrawRoom with Game Mode and Conversation Mode. (Other features of the site allow the teacher to create a video in which the teacher records himself asking a question and then sets a time limit for how long the student has to answer the recorded questions, somewhat similar to what CLEAR by Michigan State University used to have.)

I used the DrawingRoom in Charlala.com with my students for the first time today and it was a big hit. These are the various ways I used this site:

1. WEEKEND CHAT
Collage of downloaded images from Charlala.com of Weekend chat
The first day of the school week, I start class with a Weekend Chat. There are probably 101 ways to do this, but with Charlala.com there are now 102 ways. 

I told students that we were going to chat about the weekend, but we were going to use the iPads to draw. That alone prompted some cheers. I projected my screen with the web address and the # for students to enter the DrawRoom. Then I gave students the prompt (in the TL of course), "What did you do this weekend that was your favorite activity?" Students sketched their answers, then I projected them and we talked about each of them, asking more questions and giving students additional input on each of the activities we highlighted.  

In a different class, I asked students what was their favorite activity and their least favorite activity. They drew both of them on the same sketch. Below is a screenshot of some of the responses and how that appears on the teacher screen. 
Teacher view as sketches are submitted by students.


2. LEARNING ABOUT CLASSMATES
Bucket List before student turns 30
There were 11 students in one of my classes, so I asked them to draw what they hope to do before they are 30 years old. (I explained the prompt in Spanish, the target language.) But this time I did not want them to see the names of their classmates above the sketches, (see above for an example), so I did not project my screen. As students submitted their sketches, I downloaded each one (it's a SNAP to download the submitted sketches) and I transferred them directly on a powerpoint.


After all the sketches were submitted, I told the students to number a paper 1-11. I showed all of the sketches to the students so they could preview them. Then I started with the first sketch and directed students to write the name of the person and what that person wants to do before they are 30. Example: Peter quiere ser el presidente de los EE.UU. (Peter wants to be the President of the United States.)

Note: To be clear, the collage of the 4 sketches on the left, I added the colored background when I put the sketches on the Powerpoint slide. If students want a solid color background, they have to add that in their drawing. 

After students wrote a short sentence for each sketch, we went back to #1 slide and I asked students who they had guessed for #1. If it was wrong I asked the incorrectly guessed student what s/he had as an answer. Each time the students were hearing reps of the sentence. This would be great at any level!


If the students are not able to write the sentences, the teacher can project his computer screen and then describe a sketch and students guess which sketch is being described. If you don't want students names on it, you can download the sketches and put 4 or so on a powerpoint slide.


3. REVIEW A NOVEL (or Other Text)
My Spanish 4+ students are reading 48 Horas by Carrie Toth. Before the 3-day weekend the students took their writing and speaking part of the final with the seniors, which means when we returned from Memorial Day Weekend, we hadn't read the novel for several days. To review the novel, I opened the DrawRoom for the students and told them to sketch something that happened in  chapter 1-10. 

After students submitted their sketches, I clicked on the sketches and asked students what they thought the sketch depicted. It was a novel way to review the novel! Several of the sketches are shown below. 

By the way, if you don't have the novel, 48 Horas, I strongly recommend it!


4. PREDICTIONS
When reading a novel, students can draw their predictions of what will happen next. The sketches give the students the ability to share their opinions without the language barrier and also provides the opportunity for the teacher to talk about the predictions in the target language.

You can use Charlala.com in place of activities when you used to have the students draw on paper. I'm not suggesting that you completely eliminate drawing on paper, students of all ages enjoy that from time to time, but if your administration is expecting to see use of technology when they observe your class, the Charlala.com website makes it possible. The best part is that you can easily share the sketches with the whole class AND you can download the sketches to use on other documents and to review at a later date.

5. STORYTELLING and TPRS STORIES
I attended an hour webinar hosted by Chris Hammer this evening in which he demonstrated how Charlala.com can be used when telling a story to the class. During the demonstration, Chris chose several sketches as the "masterpieces". If you continue to choose a masterpiece for each section of the story, after the story is completed you can download a pdf of the sketches and use that document to review the story the following day, for the students to use the sketches as a retell, or possibly to complete a Write and Discuss with the sketches on a document of the students to write on.

The screenshot below shows the masterpieces on the right upper corner. 


After closing the DrawRoom, you will have the option to download the pdf.


Ohhh, the possibilities! It's easy to see that this new tool (which I think Chris first introduced it in August 2018) will be useful in the ways I outlined above and many other ways.  

This spring, when the administrators were working on the teaching schedules for the 2019-2020 school year, I requested to have some Spanish 1 classes to work on the curriculum. (You can't imagine how difficult it was for me to give up my level 2 students for one year, but I felt it was in the best interest of the program, regardless of how much I would miss teaching that level!) Anyway, I am looking forward to using this website with my Spanish 1 classes in the fall, as well as my upper level classes. 

The site is currently in Beta. I suggest you spend some time this summer checking it out and exploring the possibilities. Chris Hammer, the creator of the site, welcomes feedback from teachers and is quick to respond to those suggestions. He is constantly improving and updating the site. In this evening's webinar, he mentioned several updates that they will work on over the summer and I'm sure that it will be even more AMAZING when the new school year rolls around.

If you have some great ideas on how you will use this in your classroom, I would LOVE to hear about them. 

Tuesday, April 16, 2019

Absent Students: Catching Up on Missed Chapters

An absent student = a student that can easily fall behind in class. You can post what students missed on an online platform so they can stay up-to-date even after an absence. 

But, let's face it, the majority of students don't check what they missed when they were absent. Instead of checking for missed work online they come to class asking,  "What did I miss yesterday?" or even better, "Did we do anything yesterday when I was absent?" 

However, I actually love when a student returns from school after an absence because this gives us the perfect opportunity to review. I really enjoy it if they missed a class story or a chapter/chapters that we read in our class novel. I hand over this task to the community of learners in the classroom (the students). It is their responsibility to help "catch up" the student on what s/he missed when absent.

Today I did a slight variation of what I usually do for students that missed class when we are reading a class novel.  I use the name "Tess" below to make the explanation clear.

1. Put all names of students in a basket/bowl.

2. Draw 5 names. Tell the students whose name was pulled that they have to ask Tess a question about the new information/material that they learned when Tess was absent.

3. The 5 students take turns asking Tess questions. If Tess guesses the answer correctly, the student has to ask her another question. If Tess does not know the answer, the teacher pulls another name from the basket and that student has to explain the answer to Tess.

This review works well because:

- It provides additional comprehensible input for students.

- Students quickly learned that if they asked a super easy question, Tess would guess the answer and they would have to think of another question. Their questions became more involved and "meaty".

- Students not asking the questions paid attention because they knew it was possible their name would be pulled to answer the question if Tess did not know the answer. 

For novice learners, I ask the questions instead of the students.


*Teachers: you need to know your classes and your students. Obviously, do not do this activity if the student that was absent will feel awkward because he doesn't know the answers. Remember, it is the teacher's job to make sure the student knows that he isn't expected to know the answer; that the real purpose is to involve the students in the review, to think of the new information from the previous day and present that information to the student that missed class.


Tuesday, April 2, 2019

One Word Images in the World Language Classroom

PD in Philadelphia w/ Krista
In early March, the other 3 members of my World Language department and I traveled to Philadelphia for a 2-day workshop by Mike Peto. 

Krista and I have attended countless workshops, conferences, and TCI group meetings for years, but I was particularly looking forward to attending Peto's workshop since the two newest members of our department, ("new" as in they've been teaching at our school for 5 or 6 years), were also going to the workshop. Whenever Krista and/or I go to a conference, we share that information with our department when we return, but how fun and beneficial to grow professionally together as a department


PHS WL Dept driving to PD in Philly
I've been teaching with a focus on providing comprehensible input for years and I've read Mike's books, "My Perfect Year" and "Pleasure Reading", so much of what Mike talked about I had already implemented in my teaching, ie. SSR/FVR, interviewing students, writing, etc, but for me, the draw for the workshop was to see Mike demonstrate and talk about One Word Images (OWI), the Write and Discuss (W&D) aspect that follows it, and his Maravillas collection of videos and stories. I had created some OWIs in my classes this school year and last school year, but I was ready to improve my skills in that area and for my department to do the same (although I completely think Krista already has the OWI skill down to a science!). 


I chatted w Arianne Dowd!
Did you notice Mike
Peto in background?
Mike demonstrated how to create OWIs by creating one with the attendees as if we were students in his Portuguese class. Immediately after walking us through the steps for the OWI, he wrote about what we had just discussed, asking for answers from the class at our level. He "revealed" the sketch that two members had drawn while we were creating the image and reviewed the information using the sketch to point out different aspects of the story. More input, more repetitions of high frequency words, and more opportunities to process the input our brains had received.

Some of my take-aways from the workshop were:

1. Encourage students to "free their minds to imagine" before creating a OWI. Have students imagine with you as you move the image from the board to a stool or table in front of the room where all students can "see" the object. Set the students up for success by preparing them to be creative. Unfortunately, by the time our students are in high school, many of their required work and assignments for school do not allow them to utilize their imagination so we need to reawaken their minds to let the creativity flow.


Discussing info from the OWI extension story.
2. Do a Write and Discuss about the OWI immediately after the students have helped you create an interesting object. The information that needs to be decided about the object are listed HERE. Limit the time spent on this stage and enlist the help of a student to keep track of the time for you. While you are creating the object, assign two artists (one student artist and one student to color the artwork). Have them draw in an area of the classroom that the other students do not see what they are drawing and are not distracted by the two artists.

Do the W&D before you share the artwork with the class. Writing about the object, before the class sees it, gives the student artists time to complete their sketch.

3.Students should NOT write during Write and Discuss. Ask students questions that will help guide them to retell the information. Write (not type) the information on a large sheet of paper or on the board. After the information is written, may instruction students to copy the W&D, but it is not necessary. The power of W&D for students is hearing the words as they are written and seeing the syntax of the language in a written story that they already know.

The W&D also gives the student artists time to complete their sketch.

4. After Write & Discuss, students should read what you have written with the class. Mike suggested several options on how to read, but most important is to READ it!


OWI created w/ class on 4/1/19
5. Create a OWI one day, write about it, read it and the following day create, with your students, a story about the OWI. (Ask the following questions to draw out more information: Who? Where? With whom?, What is problem? How does character fail to solve the problem? What is the solution?) As a ticket out the door, tell students to write a problem that the character has, or if you have already determined the problem, you can have students write or discuss in small groups HOW the character solved/tries to solve his problem. If students write an idea on a paper as a ticket out the door, look at the suggestions and choose the best one to use in class the following day.

Write the story that you created and READ again!

6. Give students a short quiz on the OWI and story they created. All students that were actively engaged in the creation of the story, the W&D, and the reading should be successful on the quiz. Students that do not do well is a result of them not tracking in class, which has nothing to do with their language ability.

7. After the story, highlight the good in the story and the positive actions of a character. Mikes says "I like my class to be a positive force for change."


OWI - 4/1/19
8. Post/project the AP themes and use them to inspire students when they think about how to create extension stories from the OWI. How cool of an idea is this?! AP themes should be part of your class from level 1.

9. Implement OWI into ALL levels. OWIs provide a perfect and natural way to provide rich language for your students in all levels.

The summary above only scratches the surface of the OWI and W&D portion of Mike's workshop, and there were many other aspects of the workshop, not just OWIs. The best way to get all the information is to attend one of his workshops first-hand!

A few other take-aways not directly related to OWIs.

Absent students represent students that have had less verbal input. Mike said, "It's hard to keep kids in my class" because the students are absent from school or pulled out to do work for other classes. It is better for us, as teachers, to require students to make up the missed input time and hours rather than excuse them from class with no expectations.

This was a complete shift in thinking for me. For several years I have been in the camp of thinking that if an A student misses class and there was a graded activity in class, I could excuse the student from the activity because if I required her to make it up, she would end up with a grade consistent to her previous work. More work for the student and for me to show that her grade will stay the same.

However, now I view it as Mike said, the student missed valuable input in the target language, something that is extremely difficult to find at the student's specific level outside of the classroom. Students will grow in their language abilities with additional input, not by excusing them from work they missed when absent. If I truly want my students to improve, I need to hold ALL my students accountable for material they missed when absent and be willing to possibly give up a lunch from time to time to retell a class story or create a new story with students that had been absent from class.

After a student interview, do a survey for the class about what was discussed. Limit it to 5 minutes max and then do a write-up about it, followed by reading what was written.

Calendar talk is NOT about the calendar; it's about the students' lives. I knew this but it seemed to sink in deeper hearing it again!
Also, Calendar talk becomes more impactful with each day new information is discussed/learned because you can refer back to the previous day(s)' information.

Changes made upon returning to PHS
Related OWIs created in separate
classes on the same day.
Both Krista and I were in our classrooms on the Sunday following the workshop. I moved my high-frequency verb posters to the front of the room, and moved some of the SSR books/bookshelves to the front and sides of the room. 

Our department is enjoying creating OWIs with our students and watching the students' vocabulary and understanding of the language develop naturally from the rich input provided by the OWIs. Imagine my surprise when I discovered that my Spanish 4 class and another teacher's Spanish 1 class had both created a wealthy, red avocado on the same day!

Krista and I bought jumbo crayons and other crayons to add to our student artists supplies. 

I am teaching levels 4 and 4+ this semester so my goal, for the remainder of this school year, is to create a OWI every other week with my students. Next year, I have asked to teach some Spanish 1 classes to be able to review the current curriculum by actually teaching it again (it's been y-e-a-r-s since I taught level 1), I know I will be implementing OWIs into my lessons from the very beginning of the semester!
   

Tuesday, March 7, 2017

1st Attempt of Ben Slavic's Invisibles Lesson

I've been reading about the Invisibles by Ben Slavic, for over 6 months, so today I decided it was time to give it a try with my Spanish 2 students. An "Invisibles" is a character that students create, assisted by the teacher's questions to draw out more information and details for the character. 

When I said "jump in", I was referring to letting go of any constraints (targeted words) and letting the character take shape as directed by the students. My job was to keep the language comprehensible, pull out more details for the character, and keep an eye on the clock to know when to call it a wrap. 

Since this is my first experience with the Invisibles, I readily admit that my explanation may likely be unclear and inadequate. Therefore, I suggest you ask to join the Facebook group, CI Liftoff, and search for discussions of the Invisibles and examples of how other CI teachers have used them with their students.

Setting Up
Before students entered my classroom, I set up the following in the back of the room:
- an artist easel that I borrowed from the art teacher 
- a large white paper (appox. 18" x 24") attached to an oversized easel pad
- a box of colorful markers
- a 3 pronged tall swivel stool

Students noticed the easel and other objects when they entered the room and I heard comments about the artist pad, and questions about what we were going to do.

After a few short CI activities to review what we had done the previous day, I explained to the class that we were going to create a character together. My colleague next door, Krista Kovalchick, (French and Latin teacher) who had done several Invisibles last semester, had said that she suggests to the students that the character is an object, rather than an animal or person. 

I began by asking for an object; not something that could breathe. The first suggestion from a student was: milk from a horse. Um...I consider myself somewhat creative but I wasn't brave enough to create my first Invisibles character that was milk from a horse, although I'm sure that would have been one interesting character. Several students gave additional suggestions and then someone suggested "una bufanda" (a scarf). That was the one that felt right and I went with it.

Our 1st Invisible
After 30 minutes, we had the above pictured character with this description (except, of course, our description was created in Spanish, but for the sake of any reading this that doesn't teach Spanish, the description is in English).

There was a scarf that was named Gair. (It is pronounced like "Gerry". I asked the student who made the suggestion to spell it in Spanish and I wrote it exactly as he said. There is no "y" because I don't think he knew how to say that in Spanish so he ended the name.)
Gair was black with red crosses. He always wore an orange tie and a blue hat that had a white circle in the front. He had a nose and one eye, which was to the right of his nose. He had two big, blue ears that were above his nose. He did not have a mouth.  
I asked the students if Gair didn't have a mouth, how did people know if he was happy or sad. Their response was...When Gair was happy, he wore his hat with the white circle in the front and when he was sad he wore the hat with the white circle facing the back.
Gair lived in the water in a swamp. He had a brown dog.
One girl took it upon herself to start spinning a story. She used one of the words that was used in a story last week (it wasn't a focus word but she obviously had acquired it) and said, "One day Gair lost his hat and he was angry." I asked the class how someone would know that Gair was angry without a mouth and since the hat only showed if he was happy or sad.  A student said, "When Gair was angry, his blue ears dropped down below his mouth instead of above his mouth.

It took my students a little time to loosen up and freely give suggestions. The best part was when a student described how people knew Gair was angry. It's not often that that particular student participates in class without being called on, so his response was evidence that he was engaged and listening, and creating in the language. 

With the remaining 5 minutes of class time, the students wrote 5 sentences about Gair and several students shared their sentences with the class.

So.... the next step? I'm uncertain as to what that should be. I'm planning to write the full description on the board as the students copy it into their composition books. And after that...? Looks like I have to check with Krista or ask someone on the CI Liftoff Facebook page for ideas.

My take-aways: 
- Grammatically, the activity provided a lot of repetitions of he wore, he had, he was, he lived, there were.
- It was a good review of colors.
- As the character began to develop with more details, the students became more engaged, at least in their observable behaviors.
- I should encourage Jason Fritze's technique for student participation during this activity. Jason tells his elementary students to call out and only to raise their hands if they have a question.  
- The artist needs to take his/her job seriously. My artist took her job seriously; I lucked out with that because I didn't set any clear expectations.
- In a way, creating Invisibles is a variation of creating background information for a person from a photo. An example of this is my post, "Engaging lesson plans for the Imperfect Tense".  It's similar but certainly not the same thing!

I'm open to suggestions from any teachers that have used Invisibles in their classroom. What's next? What do you do differently? 

UPDATE: To the left is the document I gave to students the following day. I added this photo in response to a teacher's comment below.