If you're a Spanish teacher and you haven't heard about Revista Literal yet, then I'm here to introduce you to this incredible resource. Revista Literal is the brainchild of Martina Bex, a language curriculum specialist and also the founder of The Comprehensible Classroom, the SOMOS curriculum, Garbanzo language website, and creator/writer of endless resources on TeachersPayTeachers (not to mention a national presenter and keynote speaker. I stated above, it is a FREE resource. According to the Revista Literal website, "Revista Literal is a monthly publication for beginning Spanish language learners written by Spanish language learners. Each month, readers submit short, original stories for publication."
After students submit their stories, Martina invites native Spanish speakers to proof the stories and then she adds glossaries for the stories and volunteers add the English translations to the glossaries. After the stories are proofed and have glossaries, Martina places the stories in an online format, creates a title page listing the stories for the month, and adds graphics to the stories. She credits the writers of the stories using the students' first name and town and state, and credits the volunteer proofers and glossary writers. Then she publishes the stories online as a free resource for Spanish teachers.
Then, voila, you have a free resource that comes to you each month to use with your students. Some of the stories are written in the present tense and others in the past.
Here are 10 ways to add the stories to your lesson plans.
1. Partner Reading. Students pair up with a partner and read the stories to each other for X number of minutes. This even works for your novice readers because of those beautiful glossaries for each story.
2. Extra Reading Resources. If you have students or parents asking what is available for a student that is struggling, or on the other end of the spectrum, a student that wants to continue learning beyond the classroom, tell them about Revista Literal. I download the resource (yes, you can download it if you prefer to read it on paper) and add it to our learning managagement system so it is always available to students.
3. Bell-ringer. Project a story from Revista Literal and ask comprehension questions for students to answer. Last week I projected the story "EL LABORATORIO" and alongside where it was projected I wrote the following questions for my Spanish 1 students to answer in English.
ANSWER IN ENGLISH:
1. Write 2 descriptions for Dave.
2. Write 3 facts about his job.
3. List 4 things about Karen.
Although I only asked for 2 descriptions for Dave, when I went over the answers with the class and a student responded with 2 of the descriptions, I asked what other descriptions were mentioned. I did the same with #2 and #2, Then we read the end of the story together.
4. Sub Plans! Use your imagination on how you can make your life easier when you need to be absent from work. Revista Literal will continue to provide comprehensible input to your students during your absence.
5. Running Dictation. Read Martina's explanation of Running Dictation here. If you want to put a new spin onto running dictation, use an online crossword puzzle creator and make a crossword puzzle of information from the story. You'll get double-whammy of reading out of the story because students read the story from Revista Literal (in the hall or wherever you have it posted) and then have to read the crossword clues at their "home base" in the classroom.
6. Chronological Order. Pull some sentences out of the story that can easily conform to a timeline and have the students predict the order of the story. Obviously, do not read the story with the students before this. If you want to do this as a group, show (tape to the board) 2 of the sentences and ask students which one is first in the story, then add another sentence and students decide the placement of the third sentence. Add another and continue; students can change the order as new sentences are added and the story order becomes clearer (or they think it becomes clearer).
7. Find It. Project the story, read it together with the students, then play Find It with flyswatters as explained here.
8. Mosaic Story(a). Do this before reading the stories with the students. Pull sentences from 3 different stories from Revista Literal and list the sentences on one paper in random order. Write a brief description of each of the stories (brief!-brief!-brief!) in English (don't mention any of the characters in the story by their name in the story), and the students' task is to determine which sentences go with which story.
9. Mosaic Story (b). Again, do not read the story with the students before completing this task. Pull sentences from several stories and have the students create a story using the sentences. You could tell students they can omit X number of sentences and/or you can tell students to add sentences to make the story flow. The Mosaic Story (b) activity will provide your novice high and intermediate students an opportunity to create with the language.
10. Go crazy! Students use any sentences from the entire monthly issue to create a short story. Limit the students to 10 sentences or whatever number works best for you. Come to think of it, THIS would be a good emergency sub plan to have available when you need it.
Obviously, since Revista Literal has stories, there are a boatload of possibilities.
Thank you Martina for making teaching a bit easier. ❤️
Reading, Storytelling, and Ideas for Technology use in the Target Language.
Sunday, October 20, 2019
Wednesday, October 2, 2019
Charlala + Sr. Wooly Resources = Happy Students & Teachers
Ever since I stumbled across Charlala.com, thanks to a post on Twitter, my mind has been bombarding me with ideas of how to use it in class. If you don't know about Charlala.com yet, go to the website and explore (you will love it, I promise) and check out these explanations of how I've used it in the past.
My Spanish 1 students have watched Sr. Wooly's GUAPO video and completed a few of the extra activities that he provides on his website. One of those activities was the cloze activity. I printed the "fácil" version on one side of a paper and the "difícil" version of the cloze activity on the other side. (This is perfect for differentiating instruction in the classroom!)
After we went over the lyrics, students got an iPad and I instructed them to chose one of the lines in the story and to sketch it on the charlala.com webpage. If you know the GUAPO song, you know that the lyrics are repeated many times, which means there weren't many things for the students to draw. (But, this can be a good thing! Read on.)
After the students submitted their sketches, I projected many of them onto the board. First, students had to identify which line of the song the sketch represented and then we described more details about the sketches. It didn't matter that there were five sketches of a man with green eyes and brown hair. The students heard a huge amount of comprehensible input on high frequency structures (tiene, es, soy) plus useful adjectives, nouns, and expressions (guapo, feo, mujeres, alto, no es necesario).
If you use songs with your students and want a new way to re-use the song for more comprehensible input, give this a try! If your song is a story, after viewing the sketches, you could ask students to put the song in order using the sketches.
ENOY!
Avoiding a Crash and Burn Lesson
Short and simple: when you sense your lesson headed toward an eminent crash and burn - ABORT. Change things up or recreate your lesson on a fly but do NOT continue down that sad little destructive path.
Last Wednesday, I had what I thought was a well-planned, great lesson and I was going to provide loads of CI to my Spanish 1 students. But, for whatever reason, one particular group of students came to class and it felt as some unknown force had sucked out all of their energy on the way to my classroom, or maybe even in a previous class. Whatever caused it, was beyond my control. What happened in my class to turn that low energy into attentive and engaged students, was my task at hand.
Before I took my advice above, I trudged on, through a warm-up that was a bit too challenging, past the mini-lecture I gave to tell them about the power of a great education, and even a tried-and-true brain break that fell flat. I was minutes from a complete crash and burn.
Here I was, ready to go into the main part of the lesson, with a classroom of students running on "E" (empty). I was going to tell them a story about two friends that went to a horror movie, but in my mind's eye I didn't envision a good outcome.
Thankfully, I remembered what I've heard countless times at conferences and workshops and have told others many times: STUDENT ACTORS. Don't simply tell the story; have students act out the story. As (good) luck would have it, when I asked for actors, 5 students raised their hands, two of which can naturally draw and keep the attention of their classmates.
Within minutes of "hiring" the two actors and starting the storytelling process, the tide started to turn. The actors were funny but not distracting, I added movement (student actors "ran" around the room to arrive at the movie theater), I used props (Monopoly money and canisters for popcorn) plus a 3rd actor to sell the popcorn), and coached them to act scared, really scared, during the "horror movie".
My student actors were the difference between a ho-hum story and a funny, interactive story. The students' energy during the story as they watched the student actors and laughed with them, flowed over to the retell of the story and to the Write & Discuss. It allowed for loads of CI to receptive ears.
So, when you see the Crash and Burn nearing, abort. There's nothing wrong with that and everything wrong with ignoring the fact that something needs to change - immediately.
A few reminders when "hiring" student actors:
- be prepared to coach the students to bring out the best of them and the story
- don't accept mediocre
- if you need to "fire" student actors, do it swiftly, but gently
- thank the student actors for a job well done.
Wednesday, September 18, 2019
Fun App: TextingStory Chat Story Maker
Get ready for that feeling when you find an app that you immediately think of a boatload of possibilities for using it in your classroom.
I was scrolling through Twitter tonight when I saw a Tweet from Meredith White about the app, TextingStory Chat Story Maker. Less than a minute later I had downloaded the app and was creating a short story to use in class tomorrow for my bell ringer.
I made the video to go with Martina Bex's curriculum, SOMOS 1 Unit 2. I'm enjoying the ease of using the SOMOS curriculum, especially since this is the first time I've taught Spanish 1 since spring of 2012.
Thank you, Martina (a.k.a. the coolest person I know ❤️ 😊 - right back at'cha)
Have fun using the app!!!
Tuesday, September 17, 2019
#89 - 101 Ways to Trick your Students into Reading
Students race to circle the Spanish word |
When I create activities or games, I tend to make ones in which students work with a partner or in groups of three to help keep all students engaged. But I changed it up a bit today.
First, I did a MovieTalk of a super short film clip, "El mejor de la clase", with my Spanish 1 students. The instructions and lesson plans are from Martina Bex's (The Comprehensible Classroom) SOMOS 1 Unit 02 curriculum. In the curriculum Martina included a "basic script" of what happens in the video to guide teachers on how to do a MovieTalk. After completing the MovieTalk, I read the script to my students, while clarifying, sketching, gesturing and asking questions as I read the script.
Then I asked students to tell me 5 words that they still had a question about or were unsure of. Following that, I noticed the students needed some type of movement. I made an on-the-spot decision (what teacher doesn't do that on a regular basis?) to split the class into two groups and play a game similar to Find It. However, instead of working in small groups, I used the script that was projected on the board. I numbered the students so they could follow the order and keep the game moving (instead of deciding each round which student went next).
A student from each team went to the board with a marker in hand. I said the word in English and they had to read the text in order to find the Spanish word. When they found it, they had to circle the word before the other student did in order to earn a point for their team.
I kept it moving at a fast pace by not having them erase the circle they had drawn. Each student had several turns at the board and it took 6 minutes or less. It took the place of our 2nd Brain Break today because it had everyone up and moving around.
The beauty of using this particular script is that (1) it is comprehensible, of course, and (2) many words are used multiple times throughout the text. When I called out words that were used several times in the text, there was a greater possibility that students wouldn't try to circle the exact same word at the same time (helping to lesson the chances that it would turn into a contact sport).
Saturday, September 14, 2019
The POWER of Daily Warm-ups (bell ringers)
How is it that I've only really experienced the power of daily warm-ups this year, after almost two decades of teaching?
I've used warm-ups to start class, off and on during my years of teaching, but this year is when everything has come together, along with my determination to prepare daily warm-ups and my mindset on what types of warm-ups to use for students to receive the most benefit from them.
When the teacher is consistent in providing daily warm-ups it provides a comfortable and structured start of the class for the students. I greet my students at the door and they in turn greet me with that week's password. When they enter the room, they see the warm-up projected on the board. They collect the things they need from their backpacks, grab a clipboard (I have a deskless classroom), go to their seat, and boom, they're immersed in Spanish from the very start of class.
My suggestions for creating warm-ups are:
-be consistent!
-keep it short
-always...go over it with the students
-connect it with previous lessons
-personalize it to students
-make sure students will be able to complete it without struggling
-don't collect it (that's right - don't do that to yourself!)
Some benefits of daily warm-ups are:
- Immediately immerses students in language that is comprehensible: the emphasis is on "comprehensible language", which puts students at ease and instills them with confidence because they know they can be successful in completing the activity
- Sets the tone for the class: we're going to utilize every minute of the class period in experiences that are designed specifically with the students' success in the language as top priority
- Connects to the students: use sketches that students created, and conversations/photos from previous days; students understand their contributions are important elements of the class and they are appreciated!
- Creates a familiar setting/comfortable routine: students know the routine and are immediately put at ease as they follow the routine (benefits both the quiet students and those that are filled with energy that we may wish we had 😂)
- Provides quiet time: students that complete the warm-up know they will have a few moments to relax after they complete the activity as classmates finish up the warm-up
- Reviews material from previous day(s): reinforces the material introduced/ discussed in the past, providing additional input
- Informal Formative assessment: as teacher moves throughout classroom and glances at students' work, it gives quick feedback on students' progress
- Provides time for teacher tasks: take attendance, catch absent students up to date, etc,
Below are examples of the warm-ups I've used in the last few days
1. One of the classes created this OWI (One Word Image). I used the warm--up for all three of the Spanish 1 classes the following day.
2. I used SpanishPlans' lesson "El Niño quiere un dragon" (free on TPT). This was the warm-up the following day. It's the first time students had to form the sentence from scrambled words so I did not put any extra words in the sentences that were not needed.
3. I created this warm-up based on the conversation I had with students the previous day. The lesson is from Martina Bex's Somos curriculum, Level 1, Unit 1 (free on TPT).
4. New short stories using previous introduced vocabulary. I don't require students write answers in complete sentences at this stage of their acquisition.
5. OWI reading created previous day. I taped the drawing of the OWI on the board next to where this paragraph was projected for students to refer to.
6. Unscramble sentences. Students did a similar warm-up the previous week (see #2 above). The previous day I had a substitute so students listened to the first half of a story I wrote and put on a video, and then read the 2nd half of the story and answered comprehension questions. This warm-up is based on the video & reading from the previous day.
Yes, I create a new warm-up each day, but NO, it doesn't take much time.
Monday, September 2, 2019
Creating Online Stories with MyStorybook
The website, my storybook.com, is a user-friendly site for teachers to create short stories in the target language for students. In fact, it is so easy to use, that you may want to consider it for substitute plans when you need to be absent from school.
On the left is the cover of a short story that I wrote for my Spanish 1 students after 4 days of class and a 4-day Labor Day weekend. It contains many repetitions of quiere, tiene, está, hay, and other high frequency words. Click on the link "Paco quiere un mono" to view the storybook.
After creating the story, you will need to publish it in order to be able to share it. Sharing is as simple as copying the URL as well as sharing it on social media.
There is a main page on which you will create the title page, add text, backgrounds, and characters. There is a limited collection of characters from which to choose but there is an option to upload your own images to use in your story. There is also a tab to draw directly on the page, which is what I used to make the thought bubble on the front page.
After adding text to the story page, you can change the font, the size of the font, where it is positioned on the page, the color, background color, and more. One thing to remember when using special characters in the text, is you will need to return to the text box from the icon on the left because you can't add accents and other special characters when you are typing on the storybook page.
Creating the characters is fun because you can change the hairstyle, the color of hair and skin, the eye color and expressions, the mouth, the clothing color and style, the pants color and style, and the shoes.
The options are somewhat limited but it still allows for creativity without providing too many choices that you are overwhelmed with the choices. (It would be nice if there were more than one hairstyle choice for the female characters.)
There are outdoor background scenes in a forest, city, beach, etc, and several indoor choices too.
(After putting the characters on the background scene of the forest, it reminded me of the story I use from Martina Bex named "La muchacha y la ardilla." I'm considering using this website to illustrate the story that my students create when we do this unit OR creating a parallel story with illustrations for them to read AFTER they create their story.)
At present, it is a free website, but as we know, that could change in the future as it grows and includes more choices. If you want an ebook download and a pdf of your story, the charge is $5.00.
I'd love it, if after reading this, you create a story, and then share it with me on Twitter: @sonrisadelcampo 😊
HAVE FUN CREATING!
Thursday, August 29, 2019
First Days of School (Back) in the Spanish 1 Classroom
It's been 7 years since I taught Spanish 1, but I'm happy to report that I'm back in the Spanish 1 classroom and enjoying the newness of the language to the students and the way they are soaking it up.
Last year I asked my administrators if I could teach a few level 1 classes again to revisit the curriculum. They obliged me and for the fall semester I have three Spanish 1 classes and one Spanish 4 class.
I searched for and found my old lesson plans on my computer, and I was obvious they needed some serious updating. I pulled a little something from here, an idea from there, and voila, the first four days went 10x smoother than I could have hoped for. It went so well, in fact, that even though I haven't been documenting much on my blog in the last year or so, I felt I had to share in case the lessons may be useful to others.
Following is a summary of my plans for 70 minute classes for Spanish 1.
DAY 1
1. First day intro, brief syllabus/expectations
2. Explained call back: Hola Hola Inca Kola (idea from Annabelle Williamson)
3. On construction paper, students wrote their name and something they want
4. Teacher questions in Spanish and students answers in English or si or no
I questioned a few students about their cards, asking them what they want, showing it to the class, asking if they already have that item, which other students have that item, how many/much of the item they want, etc'
In the first class, I started with a student that had drawn the money symbol. Just as in normal conversation, the student's answer led to another question, followed by another answer, which took us in another direction, and on and on it went. I only discussed the information on 3 students' cards because the questions and answers flowed so easily and the students were engaged. At least one student in the other classes also drew money so I asked similar questions in those classes too.
Keeping the conversation in Spanish involved framing my questions with cognates, writing key words in Spanish & English on the board, pointing and pausing at the question words, sketching, clarifying, comprehension checks, and all the other tricks we have to remain in the Target Language while still be comprehensible.
The conversation allowed for many repetitions in context of the words: quiere(s), tiene(s), es, está PLUS interrogatives
5. WRITE & DISCUSS: I asked students questions about the conversations and wrote the information on the board. We read the sentences when finished (4 or 5 sentences) and then students copied it into their notebooks.
BRAIN BREAKS (2-3)
DAY 2
1. Chatted about Day 1, the first day of school, for 10. Once again, it was in the TL. I asked students what classes they have, recycling tiene (has), which class in their opinion will be the easiest or the most difficult, who the teachers were, etc.
2. I asked students to READ the sentences we wrote yesterday and I wrote them on the board. We reviewed the information in the sentences but other information that we talked about yesterday but did not include in the written sentences, we READ the sentences in English, asked students "which word means X",
3. Discussed a few other student cards (quiere)
4. WRITE & DISCUSS the new information
5. I used SpanishPlan's powerpoint story "El niño quiere un dragón" for PictureTalk. HERE is the free download on TPT. More recycling of the words quiere, tiene, está and introduced dice. We read each of the slides except the last one. I saved the surprise ending for tomorrow.
BRAIN BREAKS (2)
DAY 3
1. Warm-up:
2. Re-read the powerpoint "El niño quiere un dragón"
3. Watched the short video and asked students to explain the surprise ending.
4. Read the last slide of the story "El niño quiere un dragon"
5. Discussed last two slides from SpanishPlans ppt - how much English was used?, what helped them to understand?, etc
6. OWI (One Word Image) explained HERE.
7. WRITE & DISCUSS the OWI. Below are the students' masterpieces. 😊
BRAIN BREAKS (2)
DAY 4
1. Warm-up: I posted a OWI sketch on the board from another class for students to refer to along with 10-12 sentences about the character. They chose 5 Spanish sentences from the descriptions to translate to English. When completed, I read the sentences in Spanish, one by one, and asked for volunteers to tell me in English the translations of the sentences.
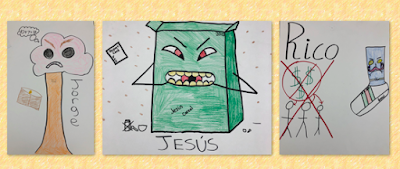
2. Reviewed the class' own OWI. If we didn't complete the information that we created yesterday, we did that in WRITE & DISCUSS format. For the class that completed the WRITE & DISCUSS yesterday, we created a story WHY Rico el calcetín was sad and then did a WRITE & DISCUSS.
3. Nineteen years ago (😊) I made two maps of Mexico & Central America & the Caribbean and of South America on poster boards and made Velcro labels of the names of the countries & Puerto Rico and bodies of water. I put the poster of South America on the board and randomly distributed the labels to students. Any student that thought they knew where their country label belonged on the map went put their label on the map (only 1 or 2 per class did this). Then I gave them hints on the answers (examples: think of Argentina as LARGEntina, Uruguay begins with U just as the word "under", as "tucked under" does and Uruguay is tucked under one part of South American; Colombia starts with "C" just as "conectado" does and Colombia está conectado a América Central) and other fun helpful hints.
We continued with the map of Mexico, Central America, and the Caribbean.
Teaching the map information in the Target Language is easy. Just remember to slow your rate of speech, write words on the board they don't know (example: país=country; frontera=border; isla=island, norte, sur, oeste, este, isla) point to interrogatives and pause;
Recyled tiene, está, es, and a few others that have naturally crept into our discussions the last few days such as pero, con, también
BRAIN BREAKS - 1 (moving around when labeling the countries provided a mini-brainbreak for students.
I deem this week in Spanish 1 a success! I am so proud of my students. They were engaged and I am delighted with the amount of growth I've seen in that short period of time.
As I said, I'm sooooo proud of them. 👍🏼
Things to keep in mind:
1. Staying in the target language is definitely doable if you are committed to slowing your speech, adjusting your language and vocabulary for the level of students, pointing and PAUSING - do not forget the pausing please; writing words in Spanish and English, short verbal clarifications/comprehension checks;
2. Brain Breaks - If you ARE successful in staying in the target language, don't fool yourself into thinking the students can maintain that engagement and focus indefinitely. They N-E-E-D a brain break. It is worth it to pause for 1-3 minutes because they can refocus much better.
3. If you forget to include brain breaks because YOU are so into your lesson, assign the job to a student to let you know when it is X-o'clock and I can guarantee you the student will not let you forget the brain break. :)
4. WRITE & DISCUSS is POWERFUL; even more so, in my opinion, when the teacher writes the sentences first, with input from the students (allow them to answer in English but you write in the TL), and only after you finish writing (and reading it and "discussing" the text) should you allow the students to copy the text.
5. OWI (One Word Images) provide rich vocabulary for students and you will get student buy-in and ownership of the character. ENJOY the process and laugh with the students and encourage and appreciate their creativity.
6. LOOK the students into their eyes. This is my 19th year of teaching and finally...I am able to consistently accomplish this. Making connections is 10x easier when you meet this goal.
7. "Haste makes waste". You can't rush language acquisition, but you can provide comprehensible, enriching language experiences for your students. Guard those precious moments of instructional time and use them to their fullest!
Saturday, July 20, 2019
One Word Images & ChatterPIX PLUS App Smashing
I stumbled across an app earlier this year that when combined with One Word Images (OWI were originally created by Ben Slavic. Read about & watch a video of a OWI on Mike Peto's Blog) will provide various possibilities for World Language teachers.
The app is called ChatterPix and it is available for IOS devices AND Android devices. Better yet, it is FREE! As soon as I saw the app I couldn't wait to add it to my presentation "Make Technology Count in the CI Classroom" for #iFLT19 in St. Petersburg, Florida, to share it with other world language teachers.
The ChatterPIX app allows you to upload a photo, draw a line for a mouth on a person or on any object that is in the photo, and then you record your voice and the "mouth" moves as you are recording.
When I was experimenting with the app and searching for photos on my camera roll, I came across a photo of a OWI that my Spanish class had created and the idea to use the app on the OWI was born.
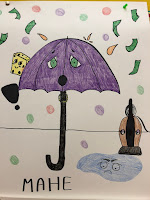
On the right is a photo of the OWI my Spanish class created. To summarize, Mahe is an umbrella that is afraid of rain and has a friend that is a sponge. (If you're wondering how did we decide on a name such as Mahe; students couldn't agree on a name so I asked four students to tell me a letter of the alphabet and from those letters I created the name Mahe. 😂)
Some of the uses when combining ChatterPIX with OWIs are:
- teacher creates the recording for students to access for additional input
- teacher creates the recording with the OWI asking true/false or short answer questions for students to answer
- teacher creates the recording with a few changes to the details/story; students find the differences between the recording and the original class story
- students create a recording as if they were the object; summarize information about the object
- students create a recording as if they were the object; add new information about the OWI (character)
In general, students can use ChatterPIX for presentational mode, especially for students that don't want to have their own photo on the end product. The finished products can be uploaded to your school's LMS (Learning Management System, such as Schoology, Canva, Edmodo, etc.)
- students draw a character from a novel the class is reading and record as if the students are the character; what are his/her thoughts on what is happening?; what does he/she hope does/doesn't happen?; how does s/he feel?
- choose a painting and have the painting tell what is represents (great for art "units")
- teacher uses photo and records a voice; students decide if what the person or object says is logical or illogical in reference to what is happening in the photo
- students create a comic strip and upload it to a powerpoint or googleslides; make characters talk with ChatterPIX
Below is an example that MadameMoran tweeted which uses ChatterPIX. (#greatmindsthinkalike) 😊
Next...
If you want to step into App Smashing, try combining a app or website that removes the background in photos of people (and objects if you're willing to pay extra or do extra detailed work), then add a new background for the people in the photo, and make either the people talk with ChatterPIX or pick an object in the photo to talk TO the people. (Thanks to Krista Kovalchick for permission to use the photo with her and me.)
Below is a screenshot of a slide from my Tech Presentation at #iflt19 on Appsmashing with ChatterPIX and the website Removebg.com followed by the steps I followed to create the above video.
The app is called ChatterPix and it is available for IOS devices AND Android devices. Better yet, it is FREE! As soon as I saw the app I couldn't wait to add it to my presentation "Make Technology Count in the CI Classroom" for #iFLT19 in St. Petersburg, Florida, to share it with other world language teachers.
The ChatterPIX app allows you to upload a photo, draw a line for a mouth on a person or on any object that is in the photo, and then you record your voice and the "mouth" moves as you are recording.
When I was experimenting with the app and searching for photos on my camera roll, I came across a photo of a OWI that my Spanish class had created and the idea to use the app on the OWI was born.
On the right is a photo of the OWI my Spanish class created. To summarize, Mahe is an umbrella that is afraid of rain and has a friend that is a sponge. (If you're wondering how did we decide on a name such as Mahe; students couldn't agree on a name so I asked four students to tell me a letter of the alphabet and from those letters I created the name Mahe. 😂)
I uploaded the photo to ChatterPix and added the voice.
Some of the uses when combining ChatterPIX with OWIs are:
- teacher creates the recording for students to access for additional input
- teacher creates the recording with the OWI asking true/false or short answer questions for students to answer
- teacher creates the recording with a few changes to the details/story; students find the differences between the recording and the original class story
- students create a recording as if they were the object; summarize information about the object
- students create a recording as if they were the object; add new information about the OWI (character)
In general, students can use ChatterPIX for presentational mode, especially for students that don't want to have their own photo on the end product. The finished products can be uploaded to your school's LMS (Learning Management System, such as Schoology, Canva, Edmodo, etc.)
- students draw a character from a novel the class is reading and record as if the students are the character; what are his/her thoughts on what is happening?; what does he/she hope does/doesn't happen?; how does s/he feel?
- choose a painting and have the painting tell what is represents (great for art "units")
- teacher uses photo and records a voice; students decide if what the person or object says is logical or illogical in reference to what is happening in the photo
- students create a comic strip and upload it to a powerpoint or googleslides; make characters talk with ChatterPIX
Below is an example that MadameMoran tweeted which uses ChatterPIX. (#greatmindsthinkalike) 😊
Presentational Mode (writing, speaking, visually representing) Next...to app smash with @Flipgrid #langchat @EmilyBoatright @ptyut1999 @MadameDarlis @gadoeworldlang pic.twitter.com/j9g5VvKnHN— Madame Moran (@AlisonM19365957) July 19, 2019
Next...
If you want to step into App Smashing, try combining a app or website that removes the background in photos of people (and objects if you're willing to pay extra or do extra detailed work), then add a new background for the people in the photo, and make either the people talk with ChatterPIX or pick an object in the photo to talk TO the people. (Thanks to Krista Kovalchick for permission to use the photo with her and me.)
Below is a screenshot of a slide from my Tech Presentation at #iflt19 on Appsmashing with ChatterPIX and the website Removebg.com followed by the steps I followed to create the above video.
1. Take a photo. Make sure there are not other people in the background!
2. Upload the photo to removebg.com and remove the background. Download the photo from the removebg.com website.
3. Choose another photo to which you want to add the person/people on the downloaded file from removebg.com. (My friend, Karen, sent the photo in this step when she was at Epcot and I was at in-service. Years ago I was at Epcot but not with Krista, the woman in the photo with me.)
4. Layer the edited photo from removebg.com to the new background.
5. Upload the new photo to ChatterPIX. Choose a person or an object to animate with a voice. Download the video with voice recording to your camera roll or computer for use in your world language classroom.
This website takes all the work out of removing backgrounds. I used it with ChatterPIX but I'm sure you'll find uses for it for other activities in your World Language Classroom. Or, have fun using it and surprising your friends with the photos. After all, having fun with tech shouldn't be limited to our classrooms!!
Wednesday, June 5, 2019
Charlala.com - Great Features using the DrawRoom and creating DrawSets
In my previous blog post I wrote about using the DrawRoom of the website Charlala.com for:
- Weekend Chats
- Learning about Classmates
- Review a Novel
- Predictions
- Storytelling and TPRS Stories
Today, I received a message from Kara Jacobs of CE Resources (Check out her blog. It is a treasure trove of resources for Spanish teachers):
Then Kara sent me some screenshots of several DrawSets that she had created and said if teachers could share the DrawSets with each other, it would be an excellent resource for those reading the same novels with their students. AWESOME idea, Kara!! (The answer to her question is at the end of the blog post.)
I started experimenting with the DrawSets features with sentences from novels. I chose the Frida Kahlo novel written by Kristy Placido (find it at Fluency Matters) because I read that with my Sp4 students. These are the steps to create a DrawSet and how to use it with students:
1. On the home page of CHARLALA, on the left column click on DrawRoom.
2. Click on Create New DrawSet.
3. Type your title. I haven't figured out how to edit the title of the DrawSet after the DrawSet has been created, so be mindful of the exact title you want for your DrawSet.
4. Add the terms (words) or phrases to your DrawSet. I chose 6 sentences from chapter 5 of Frida Kahlo when Frida and her dad are walking in the park, her dad has an epileptic attack, a boy sees Frida occupied with helping her dad and tries to steal her father's camera.
5. Click on Start DrawRoom. I opened the DrawSet for "students" (in quotations because I was experimenting at home with several devices, but I will refer to the devices as students. In two days I am going to use this feature with students at school but until then I'll use the examples and screenshots from my devices I used at home).
6. Choose "Game", adjust settings for time, music, choose which set you want to use on the drop down menu (only after you have created DrawSets), then click on START.
7. The screen will display the following message (website and code to enter) and students enter the DrawRoom using the code.
8. After students have entered the DrawRoom, click on START.
9. The students screen will display one of the terms or one of the phrases that the teacher created in the DrawRoom. (see screenshot below). The student needs to draw the term or phrase and then click on FINISH to send it to the teacher and enter it in the sketches that will be shown in the game. Some students will receive the same term/phrase which is not a problem.
10. The teacher can end the ability for students to draw at any time. If your students are taking a long time to draw, you decide how much time you give them to draw.
11. The teacher then starts the game. The teacher's screen will display one of the sketches and the students' screens will display several choices and the students match the term/phrase to the sketch.
12. Students receive points for correctly matching the term/phrase to the sketch.
13. When you end the game, you have the opportunity to download as many of the student sketches as you want. How COOL is that? After downloading the sketches, you can use them as a review the following class.
- Weekend Chats
- Learning about Classmates
- Review a Novel
- Predictions
- Storytelling and TPRS Stories
Today, I received a message from Kara Jacobs of CE Resources (Check out her blog. It is a treasure trove of resources for Spanish teachers):
Then Kara sent me some screenshots of several DrawSets that she had created and said if teachers could share the DrawSets with each other, it would be an excellent resource for those reading the same novels with their students. AWESOME idea, Kara!! (The answer to her question is at the end of the blog post.)
I started experimenting with the DrawSets features with sentences from novels. I chose the Frida Kahlo novel written by Kristy Placido (find it at Fluency Matters) because I read that with my Sp4 students. These are the steps to create a DrawSet and how to use it with students:
1. On the home page of CHARLALA, on the left column click on DrawRoom.
2. Click on Create New DrawSet.
3. Type your title. I haven't figured out how to edit the title of the DrawSet after the DrawSet has been created, so be mindful of the exact title you want for your DrawSet.
4. Add the terms (words) or phrases to your DrawSet. I chose 6 sentences from chapter 5 of Frida Kahlo when Frida and her dad are walking in the park, her dad has an epileptic attack, a boy sees Frida occupied with helping her dad and tries to steal her father's camera.
5. Click on Start DrawRoom. I opened the DrawSet for "students" (in quotations because I was experimenting at home with several devices, but I will refer to the devices as students. In two days I am going to use this feature with students at school but until then I'll use the examples and screenshots from my devices I used at home).
6. Choose "Game", adjust settings for time, music, choose which set you want to use on the drop down menu (only after you have created DrawSets), then click on START.
7. The screen will display the following message (website and code to enter) and students enter the DrawRoom using the code.
8. After students have entered the DrawRoom, click on START.
9. The students screen will display one of the terms or one of the phrases that the teacher created in the DrawRoom. (see screenshot below). The student needs to draw the term or phrase and then click on FINISH to send it to the teacher and enter it in the sketches that will be shown in the game. Some students will receive the same term/phrase which is not a problem.
Student screen with Drawing Prompt |
Student screen - click on FINISH to submit drawing |
10. The teacher can end the ability for students to draw at any time. If your students are taking a long time to draw, you decide how much time you give them to draw.
11. The teacher then starts the game. The teacher's screen will display one of the sketches and the students' screens will display several choices and the students match the term/phrase to the sketch.
Teacher's screen |
Student screen |
12. Students receive points for correctly matching the term/phrase to the sketch.
13. When you end the game, you have the opportunity to download as many of the student sketches as you want. How COOL is that? After downloading the sketches, you can use them as a review the following class.
To answer Kara's questions, I emailed Chris, the creator of Charlala, and he said the ability to share DrawSets with other teachers is something they will add in the future.
How is it possible that this website keeps getting better and better?
THANK YOU, Chris!
Subscribe to:
Posts (Atom)